QuickBooks Error Code H505 is a common error encountered by users many times. It usually occurs when a user tries to run QuickBooks Desktop in multi-user mode. This error belongs to the H series which is often related to a company file. To tackle QuickBooks error H505 we have brought you this article where we will discuss about this error in detail. We will provide information about its symptoms, causes, and troubleshooting solutions to rectify this error.
To learn more about this issue keep reading this article till the end. However, if you are seeking expert assistance, you can contact our technical support team. Our experts will provide you with round-the-clock assistance and will resolve your issue by remotely accessing your software on your behalf. Reach out to us by using our helpline number i.e. ++1-844-719-2859.
What is QuickBooks Error Code H505?
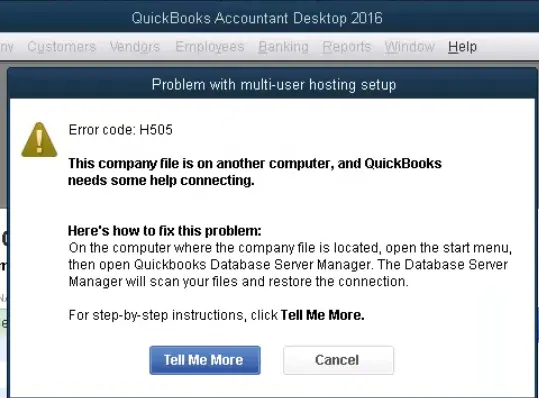
QuickBooks error code H505 appears when a user tries to get company files or data to another computer and that computer does not have the appropriate installation configuration or the computer requires additional installation or configuration. The H line error is related to hosting installation problems. This error code appears on the screen because one or more of the user’s computers are set as QuickBooks servers. often the error is related to the company file, which can hamper the sensitive data. Thus, it is always recommended to keep a backup of the company file, so as to avoid any sort of data issue in such scenarios. The following error message may appear on your computer screen when this error occurs:
| Error Code: H505 Error Description: This company file is on another computer, and QuickBooks needs some help connecting. |
Another similar error: QuickBooks Error Code H202- Here is how you can fix it!!
What are the Causes of QuickBooks error H505?
Since this error is one of the most common, there are several possible causes for the H505 error message to appear. Some of the most important causes are mentioned below:
- The device’s hosting configuration is incorrect.
- The presence of an incorrect or corrupt .ND file makes the QB company file inaccessible to the entire network.
- Incorrect DNS settings can cause such errors.
- This can happen when QB services like QuickBooksDBXX/QBCF are down.
- In case the database server manager not working or cannot find the IP address or it is using several different IP addresses.
- This error can occur if the system’s firewall settings prevent QuickBooks from accessing the company files.
What are the symptoms of QuickBooks error H505?
The signs and symptoms of Multi-User Error H505 are as follows:
- This error appears and freezes an active program window.
- The system often crashes when running the same program.
- If error code H505 appears on the screen.
- QuickBooks cannot enter multi-user mode.
- Another possible sign is that Windows is running slowly.
- If you cannot access the QuickBooks company file from another computer or server.
- If QuickBooks crashes or crashes frequently.
- QuickBooks shows slow response time when accessing company files.
Also Read: How to Resolve QuickBooks Error 6000?
Steps to Fix QuickBooks Error H505
Try the below steps to resolve the QuickBooks Error Code H505.
Method 1: Run the QuickBooks File Doctor Tool using the Tool Hub program

- Initially, you need to download and install the QuickBooks Tools Hub program from the official site of Intuit.
- After that save the downloaded file on your computer & follow the on-screen instructions to install it.
- Afterwards, open the QuickBooks Tool Hub program by double-clicking on the newly created icon to launch the tool.
- Moving ahead, here you need to check that the QuickBooks Desktop is installed on the server computer and the network is accessible.
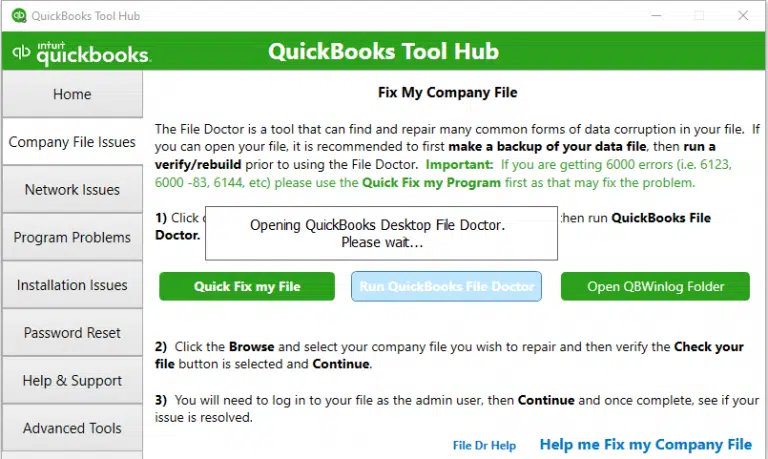
- Now, in the Tool Hub, you need to tap on the Company File Issues tab.
- Then select the Run QuickBooks File Doctor option from the options available on the screen.
- In the next step, select the company file you want to diagnose and repair.
Method 2: Create a new folder for the company file and allow access to the company file
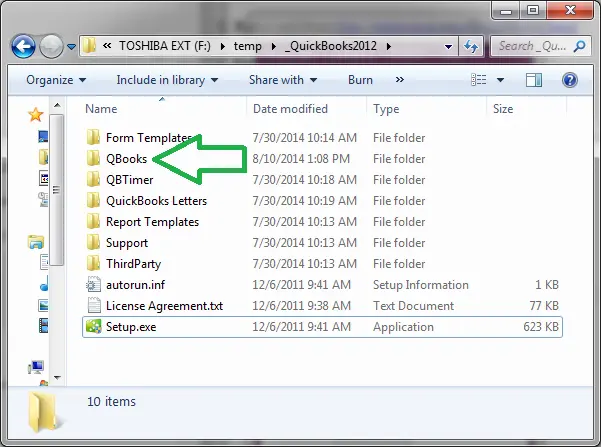
- Start the process by creating a new folder on the host computer.
- When the folder is created, ensure that Windows has file permissions from the company.
- Now you need to copy the .qbw file into the new folder.
- Finally, switch to Multi-User mode and open the company file to complete the process.
Method 3: Configuring Firewall Port Settings
This error can be cleared by configuring the firewall and security settings for QuickBooks Desktop.
- Start by opening the Run dialog box, which can be done by pressing the Windows + R key combination on the keyboard.

- Once completed, use the Run command to open the Control Panel.
- To do this, simply type Command in the Run box and press the Enter tab.
- In the Control Panel, you will have to select the System and Security option.
- Then, open Windows Firewall and Network Protection.
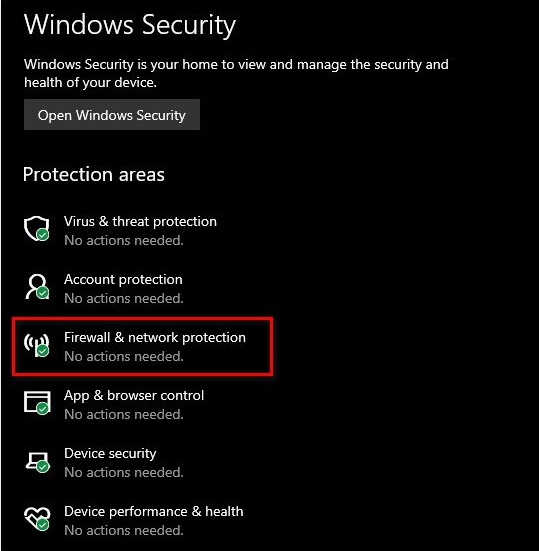
- Now click on the Advanced Settings option and select Inbound Rules.
- Then select New Rule.
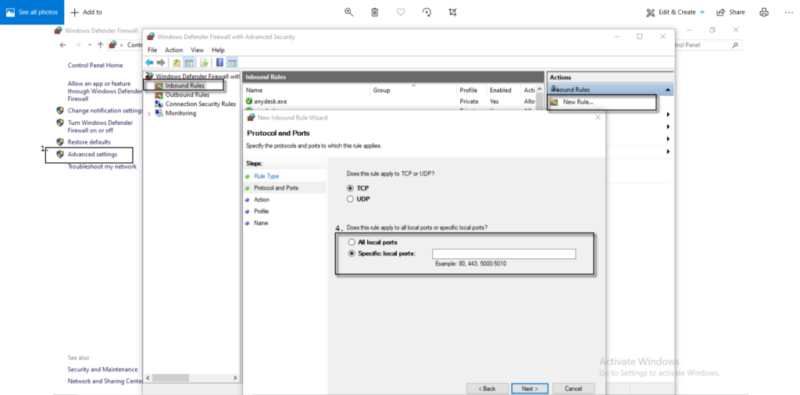
- Also select a port and click the Next tab.
- Make sure the TCP you selected is the correct TCP option.
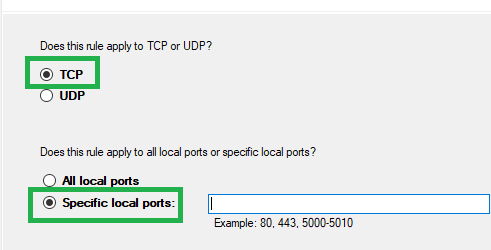
- Now import the annual portal version of QuickBooks Desktop.
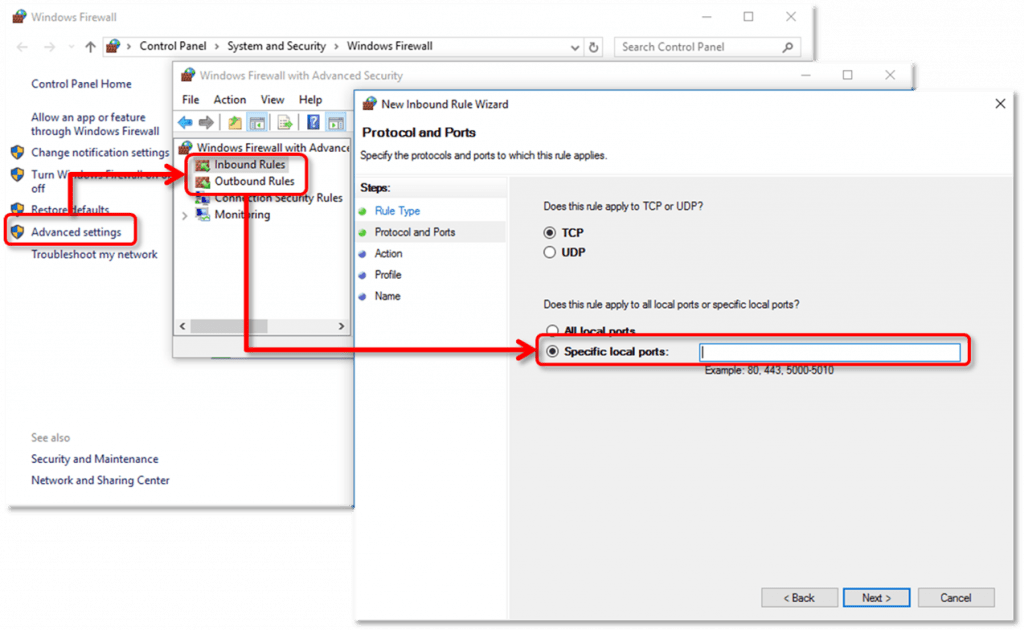
- Once the year code is entered in the corresponding field, click the Next tab and restart QuickBooks Desktop to complete the process.
Here is how you can deal with QuickBooks unrecoverable error– Must Read!
Method 4: Change QuickBooks Hosting Settings
The steps involved in this procedure are listed as follows:
Check Hosting
- First, you need to restart the QuickBooks software on both servers.
- During this process, open QuickBooks on both systems configured as multi-user.
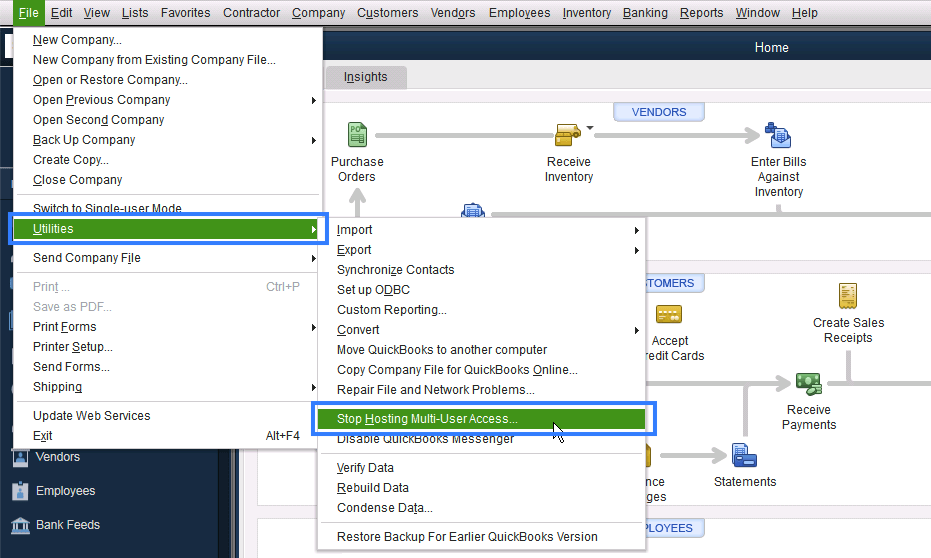
- Click the File menu then select the Utilities option.
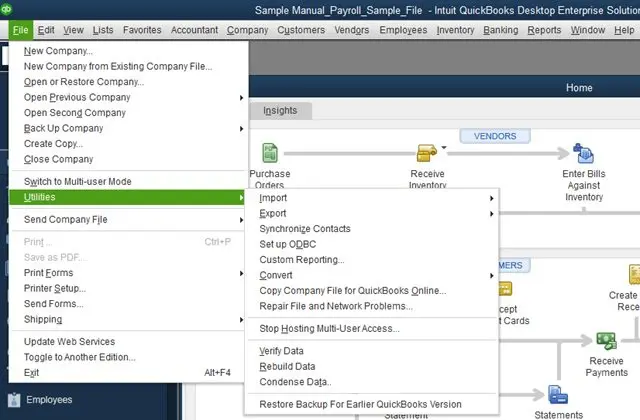
- Pause/stop storing multi-user access settings.
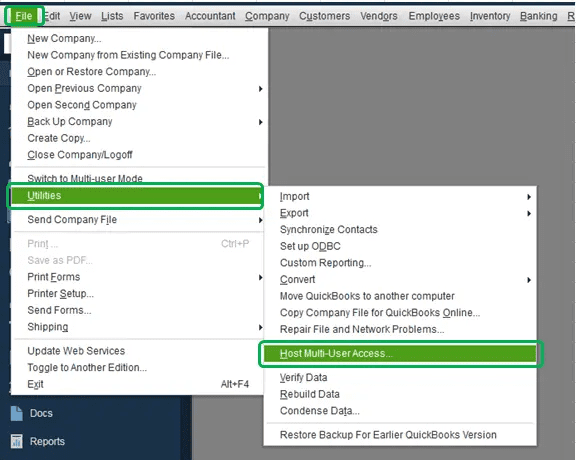
- Next is Host multi-user access or allow storage via files in the system and monitor by clicking on the Utilities option.
Verify QuickBooks services
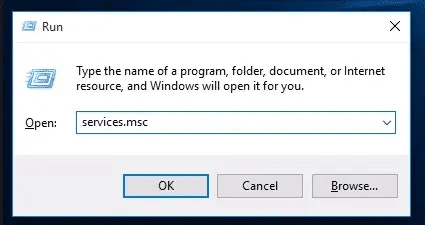
- Open the Run box by hitting the Win + R keys.
- Type in the Services.msc in the Windows search bar.
- Next, scroll down and look for the QuickBooksDBXX service in the services window.
- Double-click the QuickBooksDBXX service option and also make sure that the startup is opted as Automatic.
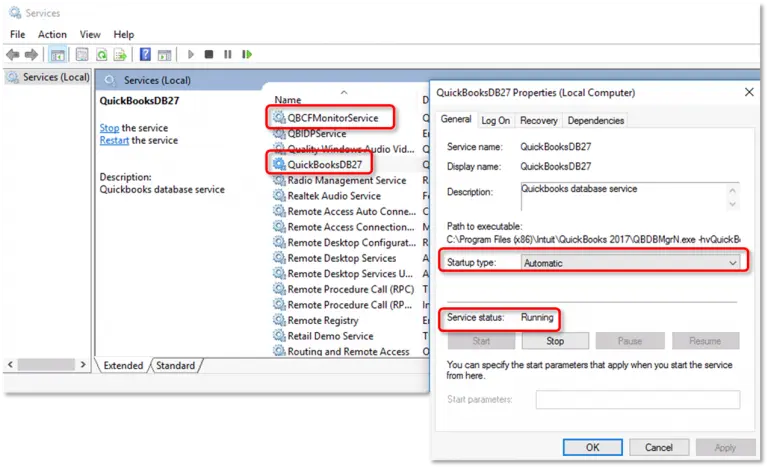
- Now you need to hit on the Recovery tab.
- In the next step, restart the QuickBooksDBXX service manually, in case it fails.
- Repeat the same if necessary.
- At the same time press the OK button to save the changes.
- Now you need to repeat the steps mentioned above for QBCFMonitorService.
- Going forward, you must access QuickBooks in multi-user mode on each affected digital system.
- The final step requires the user to search for the QuickBooksDBXX service.
- This service is a member of the administrator cluster and has accepted permissions, in case something goes wrong.
- After performing all the steps mentioned above, launch the QuickBooks software.
Method 5: Change system firewall settings and create exceptions
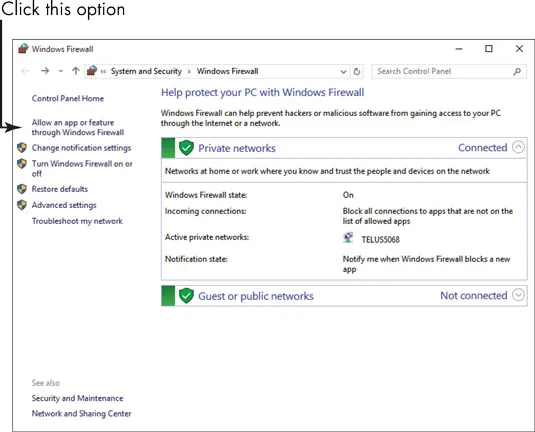
- To start, press the Windows key and then go to Control Panel settings.
- Then double click on the control panel and select firewall settings.
- The next step requires the user to select the “Allow program through system firewall” option.
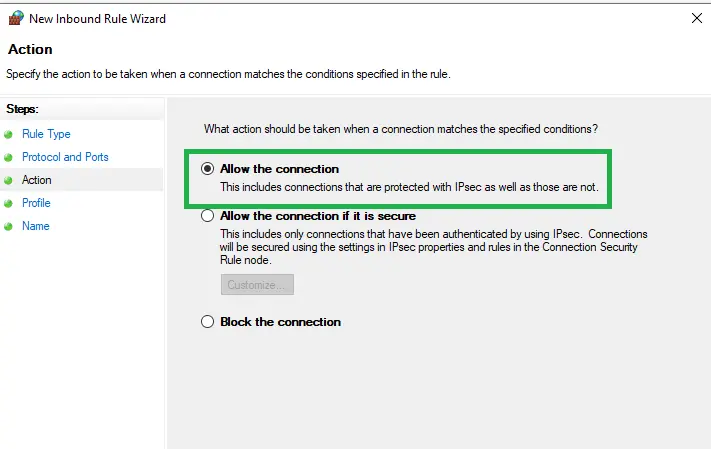
- Once done, click on the Add Program option and then include QuickBooks 20xx in the exceptions list.
- Restart the system to save changes.
- You must add the following ports depending on your QuickBooks software version:
- QuickBooks Desktop 2015: 8019, 56725, 55363,55367
- QuickBooks Desktop 2016: 8019, 56726, 55368, 55 372 44 44
- QuickBooks Desktop 2017: 8019, 56727, 55373, 55377
- QuickBooks Desktop 2018: 8019, 56728, 55378, 55382
- QuickBooks Desktop 2019: 8091, XXXX 44 44
- QuickBooks Office 202 0: 8091, xxx 44 8091, XXXX
Also Check This Out: How to Fix QuickBooks error 6000 83?
Method 6: Edit host’s file
In this solution method, the user needs to edit the host file by following the steps mentioned below:
Step 1: Find the IP address and server and workstation computer names
- First, press the Windows key + R to open the Run dialog box.
- Then, type CMD and then press the Enter key to open the Command Prompt window.
- Type ipconfig/all and press Enter to run the command.
- Now you need to find the hostname in the Windows IP Configuration section.
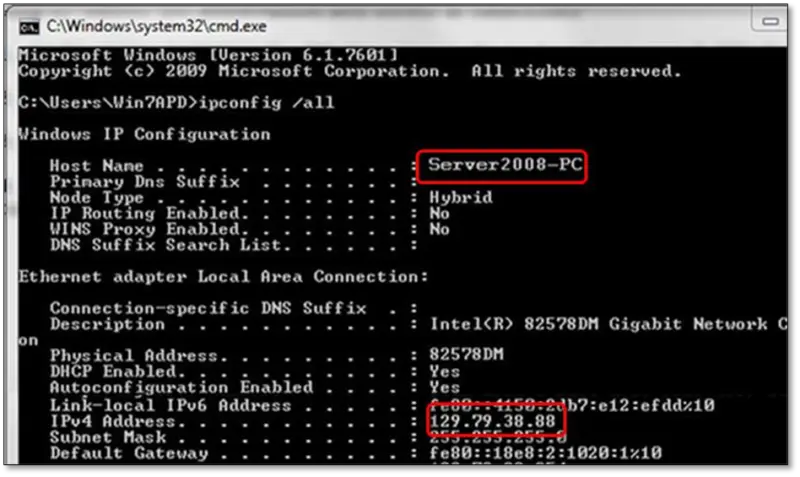
- The server name is on the right.
- The next step is to write down the server name and IP address somewhere.
- You must repeat this process for all systems with multi-user setups.
- Now return to the workstation to test the server.
Step 2: Edit the Windows hosts file Now after the above steps, you need to edit the Windows hosts file:
- First, stop QuickBooks and then go to the Start menu.
- Then go to this PC option and go to the address: C: \Windows\Systems32\Drivers\Etc or C: \Windows\Syswow64\Drivers\Etc.
- In case the user cannot find the Windows folder in the system.
- Then users can follow the steps to view hidden files and folders.
- Now user needs to click on the View tab and then click on hidden items, and then hidden files will be visible.
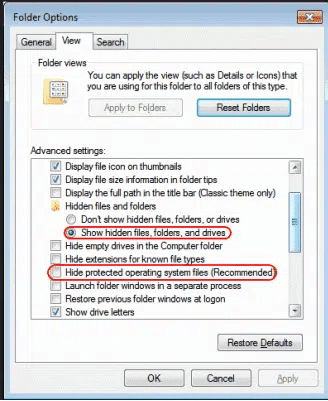
- Then right-click on the View tab click on the Open with option and open it with Notepad.
- The user must then fill in the IP address and system name.
- After entering the correct details, make sure to use the Tab key, instead of using the spacebar to place spaces.
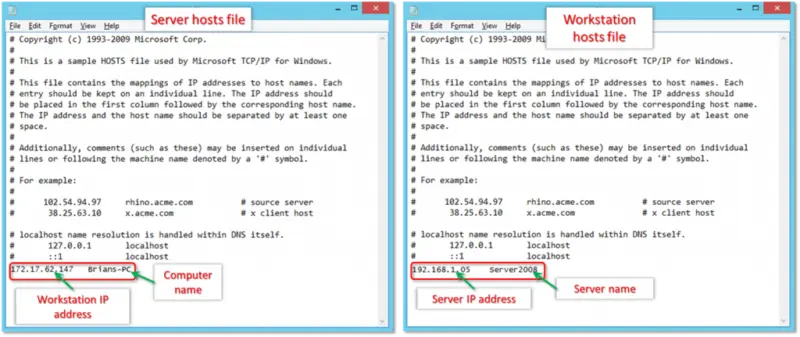
- The last step is to save the changes and then reopen the QuickBooks software in multi-user mode.
- Now check if QuickBooks Multi-User Error H505 is resolved
Method 7: Run QuickBooks Database Server Manager on the server from the Tool Hub
Step 1: Download and install QuickBooks Tool Hub on the server
- The first step is to close QuickBooks.
- Then download the QuickBooks tool Hub file.
- Next is to save the file somewhere in a memorable location.
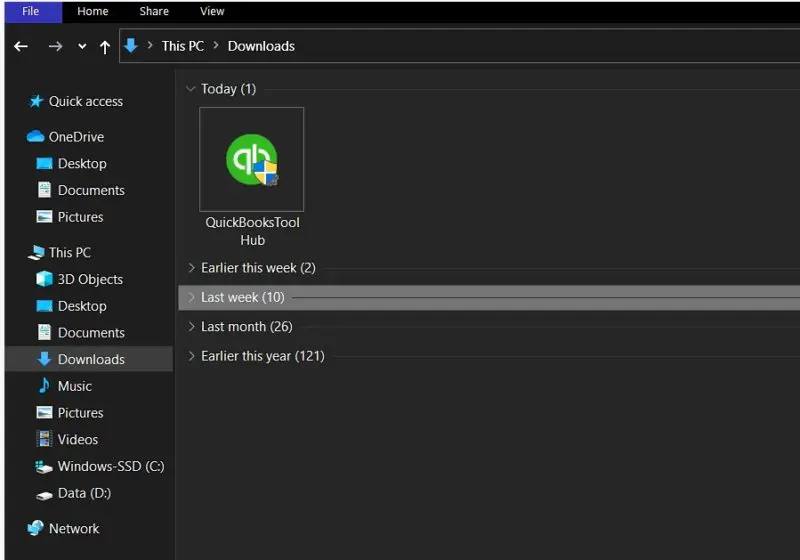
- Then, open the previously downloaded file (QuickBooksToolHub.exe).
- Once completed, the user must follow the on-screen prompts to install and accept the terms and conditions.
- Then, after the installation is complete, the user needs to double-click on the icon on the Windows desktop to open the Tool Hub program.
Step 2: Run QuickBooks Database Server Manager, from the Tool Hub program.
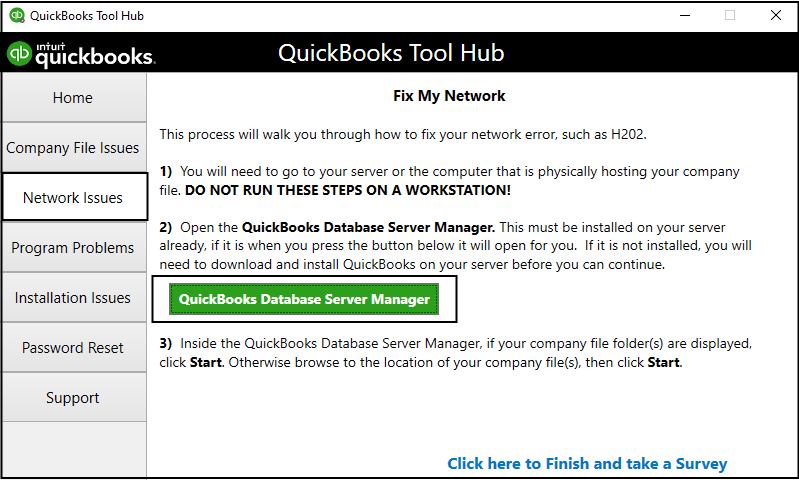
- The first step requires the user to select Network Issues in the QuickBooks Tool Hub.
- Then select QuickBooks Database Server Manager.
- If QuickBooks is not installed on the server, install it through the on-screen prompts.
- Now select the Start Scan option, in the case of the company file folder.
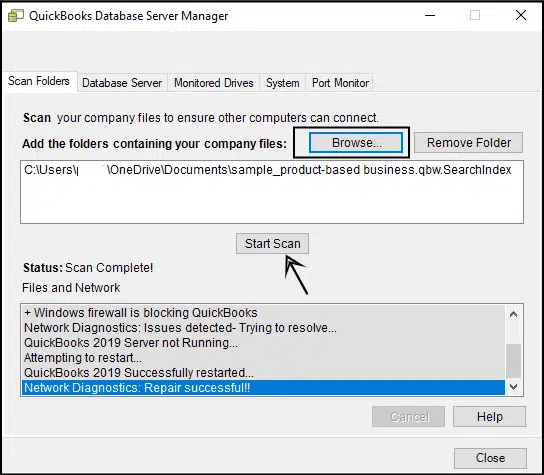
- Otherwise, users need to navigate to the company file location and then click on the Start Scan option.
- QuickBooks Database Server Manager will automatically repair firewall permissions.
- Once the scan is complete, remember to select Close.
- Finally, open QuickBooks on each workstation experiencing the problem.
- Then select the File option, as well as Switch to multi-user mode.
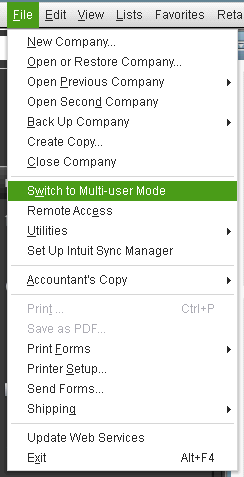
- If users detect that the server system is a workstation, they should also check it.
Also Read: How to Fix QuickBooks Payroll Error 557?
Method 8: Follow the steps based on how your company files are stored
Step 1: Host your private network
There are two ways to configure QuickBooks Database Server Manager:
- Full program options: The user installs the full version of QuickBooks Desktop Manager and Database Server on the host system.
- Server Only option: The user only installs Database Server Manager on the server system.
Step 2: Network Storage Using Windows Server 2012 Essentials R2
Users need to take several steps to use Windows Server 2012 Essentials R2 for network storage.
- Using QuickBooks Enterprise Hosting In case users are using QuickBooks Enterprise hosting, they should contact the experts immediately.
- Use a different storage solution in case the user is using another solution or any affiliated Intuit storage provider, they need to contact them directly to restart the storage environment reserve.
Method 9: Open the network ports that QuickBooks uses to transfer knowledge
Step 1: Configure Firewall Settings
- First, go to Windows Firewall Settings and then right-click on Windows and choose Control Panel.
- Then, type Firewall in the search bar and press the Enter key.
- You should click on Windows Firewall and tap on the Advanced Settings tab.
- Then, hover to the left, then right-click on the outbound rules and select New Rule.
- In the future, the user needs to tap on the ports and click on the Next tab.
- Now click on TCP and in Specific Local Ports, enter the following ports:
- For QuickBooks 2015 Desktop: 8019,56725,55363-55367
- For QuickBooks 2016 Desktop: 8019,56726,553 68 – 55372 444 4
- QuickBooks Desktop 2017: 8019,56727,55373-55377
- For QuickBooks Desktop 2018: 8019,56728,55378-55382
- Person Users need to click Next and click the For-tab login permission.
- Then click Next to enter the name and click Finish.
- Also, repeat steps 1 through 5 for incoming rules.
- The final step is to switch to multi-user mode again and open QuickBooks.
Step 2: Enable Network Discovery
- First, open the Control Panel, then select System and Security.
- Then click Windows Firewall.
- Now the user needs to click on Allow relevant application/feature on Windows Firewall.
- Also, tap on the Edit option.
- In the final step, select Network Discovery and press the OK tab.
Step 3: Find out the server name
- The user will need to open the Run command and press the Windows key + R key simultaneously.
- And, type the CMD and click on Enter key.
- Now, Enter config/all and also hit the Enter key.
- Followed by looking for the Host name, in the IP configuration section.
- The user will then be able to see the server name on the right.
- And then click on Save and move to the Next step.
Method 10: Check services on the server
- The first step is to open the Windows Start menu on the server system.
- Then type run and open the Run tab.
- Next, type Services.msc in the Run window and press the Enter tab.
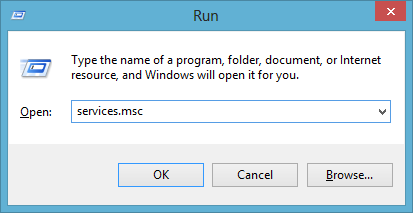
- Then, find and double-click QuickBooksDBXX from the list.
- Where XX represents the QuickBooks version.
- Also, select the automatic tab for the startup type.
- Now make sure the service status is running or started. Otherwise, select the Get Started tab.
- Follow up by selecting the Recovery tab.
- And, select restart service from each of these drop-down menus.
- First error
- Second error
- Subsequent errors
- Then select the Apply tab and press the OK tab to save the changes.
- And towards the end, repeat the steps for QBCFMonitorService.
Method 11: Fix Damaged .ND File
Network data i.e., .ND is basically a configuration file located in the same folder having QuickBooks company file. QuickBooks makes use of this file to access the file located on the network. In order to rename .nd file, you can perform the steps below:
- You need to head to the folder containing the QuickBooks company file.
- Now, you need to locate and right-click the network data file having an extension .ND.
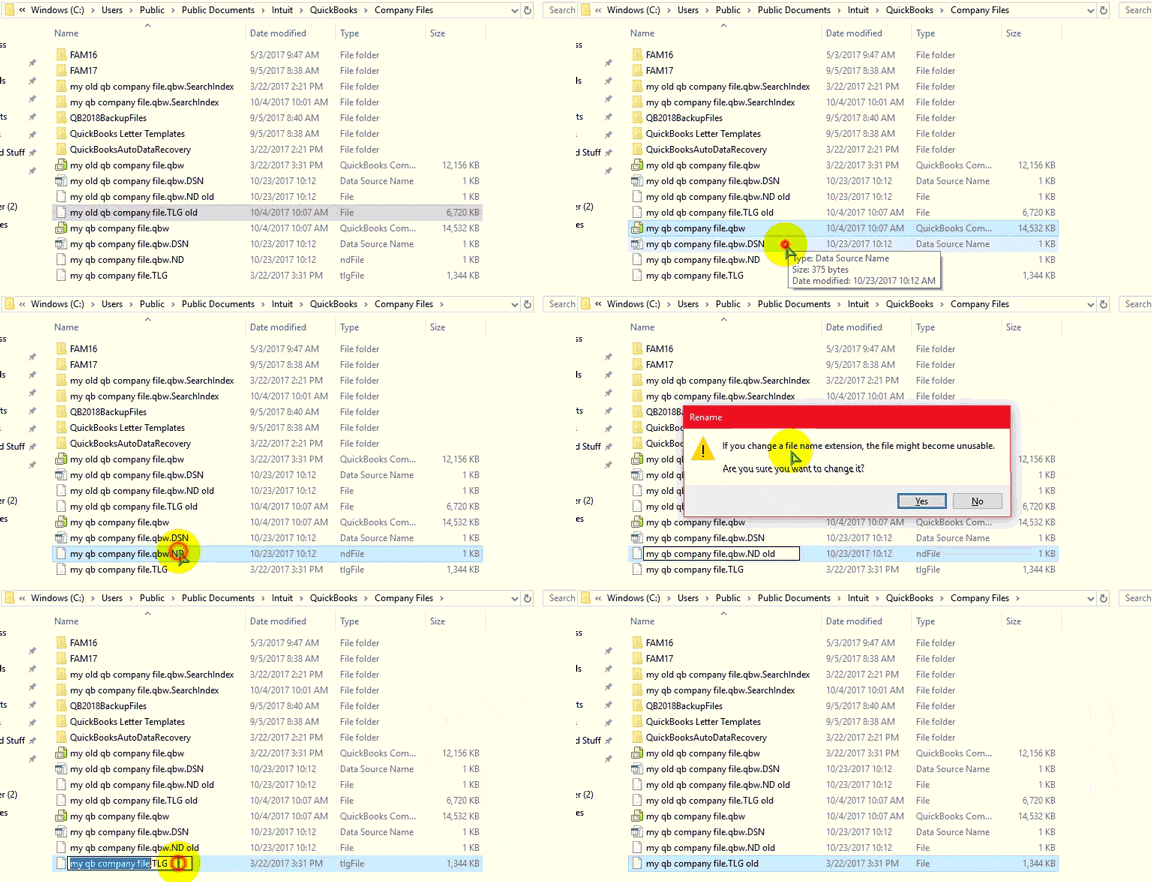
- Choose Rename tab and add .OLD at the end of the file name.
- Check if the issue gets resolved or not.
Another common QB error: Troubleshoot the QuickBooks Error 6129 0
Method 12: Disable your firewall
You can prevent your firewall from restricting QuickBooks and leading to QuickBooks error H505. The steps involved in this process are as follows:
- You need to first head to the control panel
- Furthermore, click on the system and security tab
- After that, locate the Windows Firewall Defender tab
- Now, head to the settings tab and search for the option to turn off Windows Firewall Defender
- Once done with that, you need to ensure to checkmark the public and private networks box
- The last step is to click on ok tab and check for the issue.
Method 13: Update Outdated QuickBooks
- You need to first launch QuickBooks and then head to the help menu.
- Now, click on about QuickBooks to check the version being used.
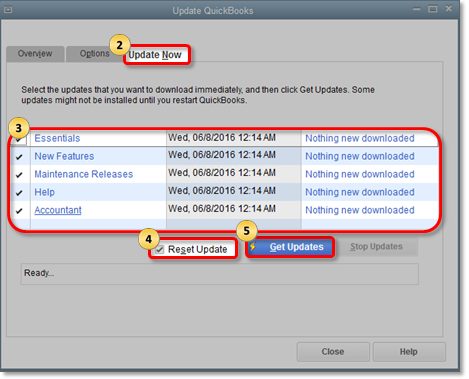
- Go for update QuickBooks desktop option
- Once done with that, click on Update Now tab
- Also ensure that you mark the new features, maintenance releases, and reset updates checkboxes.
- Now, click on get update option.
- Also, reboot QuickBooks and in case you are asked to install updates, then click on install now tab
- After installing the updates, restart the system and try accessing the company file again.
Method 14: Ping the server from the workstation
You need to verify the server and workstation connection by pining the server from the workstation. The steps involved in this process are:
- The very first step is to launch windows start menu on both server and workstations
- Type network in the search field and launch the network and sharing center
- The user needs to then pick the change advanced sharing settings option
- And then, ensure to turn on network discovery by selecting it in the network discovery and file and printer sharing sections
- You now have to learn the server name from the server to eliminate the issue:
- This can be done by clicking on windows icon to open the start menu on the server system
- Enter in run and launch the run window
- Also, write CMD in the run box and also hit enter tab
- Enter ipconfig/all and click on CMD window
- Search for the hostname in the Windows IP configuration tab.
- The server name will be available on the right side
- Note down the hostname and then copy it to notepad or word doc for prompt access
Also, return to the workstation to test the server.
- You now have to click on Windows start menu from the workstation
- Enter run in the search field and also enter launch the run window
- Type in CMD in the run window and click on the enter tab
- Also, enter ping without the brackets and click on the enter tab
- The last step is to perform the same steps for every workstation.
Conclusion:
QuickBooks Error Code H505 is to be resolved immediately as it can disrupt your work and may also cause data loss. This is a common error that QuickBooks Users often encounter. However, resolving this error doesn’t require any rocket science and few correct methods can resolve this issue. So, just go through the above-mentioned steps and apply them carefully. These steps will definitely help you to overcome this issue. If in case you still find it difficult you can contact our technical support team for assistance. Our experts will help you to get rid of this issue permanently and make sure you never face this again. You can reach our experts at our helpline number i.e. ++1-844-719-2859.
Frequently Asked Questions:
This is a technical error that appears when users try to access or move the company files to other computer systems.
1. Usually, Windows XP, Vista, 7, and 8 get infected by this error.
2. Therefore, seeking professional assistance or knowing the troubleshooting solutions is critical to resolving them at the earliest.
3. Although slow Windows performance and frequent crashes are common, trying the solutions provided on our blog will help you resolve the problem.
1. To fix error H505, you need to make sure that QuickBooks can communicate with the company file.
2. This can be done by opening QuickBooks ports in the firewall or by copying company files to the same computer as QuickBooks.
3. In some cases, you may also need to disable antivirus software or edit your Windows host file.
4. You can also check out the solutions mentioned above to fix QuickBooks error code H505.
1. H202 is a multi-user connection error that typically occurs when you try to switch to multi-user mode or when you try to access your company files from another computer.
2. This error can have a number of reasons, such as incorrect DNS settings, port problems, or firewall restrictions.
3. This error means that multi-user connections to your server are blocked by something.

