
Planning to expand your business and decided upon switching to QuickBooks desktop enterprise software? Well, that is a great decision. If you are installing the QuickBooks desktop enterprise for the first time, it is important to perform the steps correctly to avoid any technical issues. However, if you are switching to the enterprise version from the desktop version, then do not forget to back up the previous company file or accounting reports. It is important to keep the records for 10 years according to the standards.
To learn the steps involved in the process, make sure to scroll through this piece of writing. Here we are going to discuss each of the steps involved in the process carefully. You can also connect with our 24*7 QuickBooks error support experts at ++1-844-539-0188 and take professional assistance from them in case of any queries.
Steps to install QuickBooks enterprise for the first time
The process of installing QuickBooks enterprise for the first time involves a certain set of steps. Let us explore each step one by one:
Step 1: Prepare and test the network
Before simply implementing the steps, make sure that your system is ready to handle the software and has the necessary space and other system requirements.
- Network options
It should be noted that there will be different network options appearing on the workstations and servers showing different install options. Make sure to opt for the one that works best for the company.
- Using a central server– You have the option to install the QuickBooks database server manager on the central server. This option will store the company file as well. Later on, you would have to install enterprise on each workstation so that they can access the company file over the network.
- Using a peer-to-peer network– This option allows the workstation to store company file. When you access enterprise remotely, there wouldn’t be any need to install the software on workstations. One can also store the company file on a Linux server and use enterprise, running on a windows desktop client, in order to access that data.
- Testing the network bandwidth
See also: How to Troubleshoot the QuickBooks Error Code 3180?
Just in case the user is making use of a multi-user mode, then it is important to test the network bandwidth. In case of single user mode, checking firewall and AV settings only would work. The steps involved in testing are:
- The very first step is to go for a large data file for testing.
- Make a note of the size of the test file in megabytes.
- The next step is to copy the test file from a network location to the system
- Also note down the time it takes to copy.
- Carry out the following calculation to determine the network bandwidth:
- File size (in MB) x 8/ copy time
- For example, 150 MB x 8/ 25 seconds = 48 MB per second (Mbps)
Just in case the bandwidth is 40 Mbps or more than that, it indicates that the connection is fast enough for the enterprise software. However, if it is less than 40Mbps, then the connection will be too slow to run the enterprise software. In that case, it is recommended to contact the network admin to learn how to improve the network speed.
- Check the firewall and AV settings
If you are using a firewall when installing QuickBooks, then make sure to allow the software access to the network to avoid any sort of errors.
Step 2: Install the QuickBooks desktop enterprise software on the server
After performing the first step, it is time to install the QuickBooks Desktop enterprise software. You need to ensure that you have downloaded the latest release of the QuickBooks Desktop. Note that, if you are installing enterprise on various workstations, then make sure to use the same version on all workstations.
- At first, close all running programs along with antivirus programs.
- Once done with that, double-click the file that has been downloaded.
- Carry out the on-screen prompts till you reach choose installation type:
- Choose express to let the installer make the best choice
- Or go for the custom and network to customize the installation and location.
- After selecting any of the desired options, perform the onscreen prompts to complete the installation.
- Towards the end, launch the QuickBooks database server manager and configure the database server
You may read also: How to Resolve the QuickBooks Error Code 15103?
Install QuickBooks desktop enterprise on a Linux file server
- One can install the enterprise software on a Linux file server by configuring the database server manager
- Once the installation ends, set up the QuickBooks desktop server manager.
- This allows the user to access the company files stored on the server.
- This is to be done on the system where the company file is store.
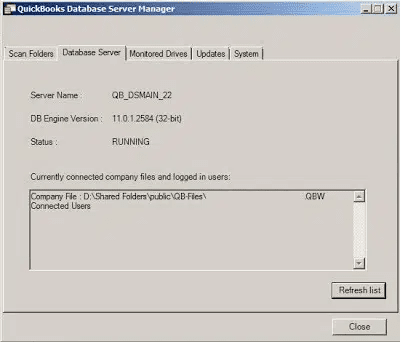
- The database server manager allows you to see the status of the service, identify which users are working in the company file, and check for updates.
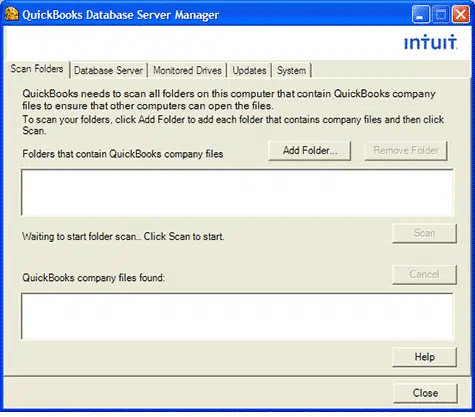
Open the QuickBooks database manager using the steps below:
- The very first step is to head to the start menu
- And then choose programs
- Once done with that select QuickBooks
- And click on the QuickBooks database server manager
Scan the company files
Allow access to other QuickBooks users by scanning all company files on the server.
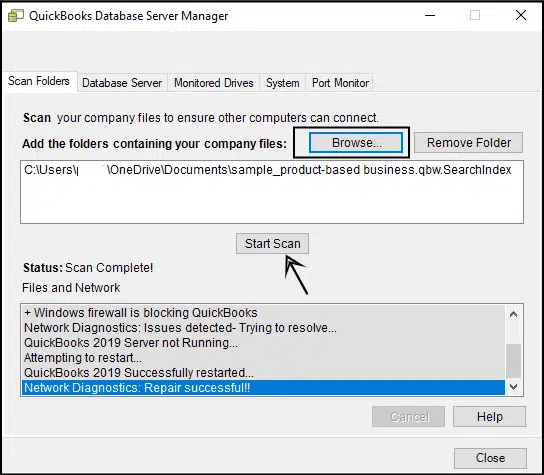
- Start by opting for the scan folders tab from the database server manager.
- Later, go for add folder
- Opt for the folders that contain the company file.
- The folder containing the company file section will appear
- If you are not sure where to store the enterprise company files, go for a scan to search the entire hard drive.
Step 3: Set up sharing
Now, the step is to set up the sharing feature that would allow the users to share the company file between workstations. The steps involved in this process are as follows:
- You need to provide access to the company file first
- Followed by installing the enterprise software on all workstations
- Moving ahead, you are supposed to set up multi-user hosting and head to the steps ahead
Step 4: Set up and import the company file
The next step is to set up the company file, add users, and find the areas of QuickBooks that can be access by the users. This would require information related to the financial activities of the company and a better understanding of the financial needs. When you set up the software for the first time, you are also required to activate the software.
Visit also: How to Rename the Qbprint.qbp file in QuickBooks Desktop?
Step 5: Set up QuickBooks desktop enterprise for the business
Depending on the business, the setup steps might vary. One has to ensure that the company file is set up and data is complete by reviewing certain information which includes:
- QuickBooks setup
- Entering optional adjustments
- Backing up the company file
- Quick start center
- Reviewing the chart of accounts
- Entering historical transactions
- Payroll
Read also: How to Troubleshoot QuickBooks Error Code 1016 – Bank Feed Error?
Step 6: Set up users and roles
Once all the above steps are performed, it is time to set up users and roles. The QuickBooks desktop enterprise software lets the user to apply user permissions to different activities. This means that certain activities can be perform only by the people you give access. The user can simply assign access levels and restrict access to specific lists and report groups based on user roles.
There is an option to make use of predefined roles along with access to certain activities, lists, or reports. It should be note that the admin would have to assign roles to every single user to avoid any further issues.
Conclusion!
Now that you know the right set of steps that you need to perform to install QuickBooks desktop enterprise for the first time, it is time to implement the steps and successfully install the software. QuickBooks enterprise is a robust software that would help you to perform your daily accounting and bookkeeping activities smoothly and also perform various other necessary tasks and operations. On the contrary, if the situation arises when the user is unable to perform the steps shared in above or in case the user is stuck at some point and requires QuickBooks technical support professional assistance, then, in that case, connecting with our technically sound professionals at ++1-844-539-0188 is recommended.
We are a team of tech-driven QuickBooks professionals who have years of experience in dealing with issues associated with this software. Feel free to discuss your queries and requirements with us and we will provide you with immediate support and assistance.
Few Other Helpful Topics:
How to Fix QuickBooks Desktop Error QBWC1039?
Steps to Troubleshoot QuickBooks Error code 5502
How to Fix QuickBooks Bank Feed Error OLSU 1024 or OLSU 1022?
