In our day-to-day life, we use to change our systems frequently due to any new version or any reason. The reason to change the system can be performance in terms of speed, space configuration, etc. Users keep working on QuickBooks every day due to which the data also keeps on storing. This could acquire space in the system leading to a lack of space and may slow down the system. So, in this case, we need to transfer our data to another system. Data migration can be done manually but takes a lot of time and effort. In this article, we will discuss the QuickBooks Migration Tool that helps in the transfer QuickBooks data to another system with ease. We will tell you about how it works and how to set up this tool.
For further queries, you can contact our CPAs and can learn more about this tool. To get connected just dial our hotline at +1-844-539-0188.
Also Read: Upgrade your company files after you switch to a new version of QuickBooks Desktop
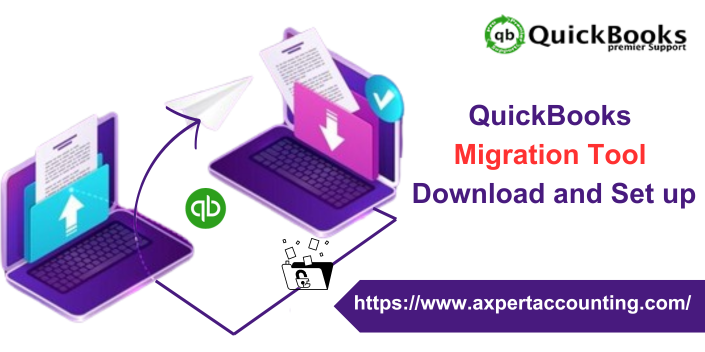
QuickBooks Migration Tool
Transferring the QuickBooks data from one system to another is difficult and very time-consuming. Also, we stake data security when we do it manually. But by using the QuickBooks Migration Tool we can save time and it also ensures the security of the data. It is the most efficient tool to transfer data easily. This new migration tool can be accessed easily via your browser. It doesn’t require a copy of QuickBooks Desktop (Pro, Premier, Enterprise, or MAC) on your system to migrate QuickBooks data.
Requirements for QB Migration Tool
Let’s discuss the requirements to run the QuickBooks Migration tool on your system.
- Both of the systems must have a good internet connection.
- You should have a USB flash drive with enough storage to retrieve data when required.
- A USB flash drive to store the QuickBooks Data and files.
Setting Up of QuickBooks Migration Tool
Following are some steps that you have to follow to set up the QuickBooks Migration Tool easily and start transferring the data.
- Log in to QuickBooks by using the admin ID and password.
- Now allow access to copy the data in your system.
- Now locate the migration tool and click on it.
- After launching the tool click on Start or Ru button.
- The migration tool will begin its process and start working.
- When the migration tool starts its process the USB flash drive starts copying and transferring some files.
Note: This tool never formats or erases any data after transferring the data. In case you want to do so you have to delete it by hitting the Delete button.
You might find this helpful: How to Convert QuickBooks Desktop to Online?
QuickBooks Migration Tool Transferring the Data
Below we have listed what can be transferred using the migration tool and what cannot be transferred. Let’s take a look:
Data that can be transferred using the tool
The following type of QuickBooks Data can be transferred using this tool:
- Three recent company files on which you have done work in your old system.
- Reports like memorized and the schedules with their local attachment.
- The detailed information of QuickBooks Desktop including the version of QuickBooks that we are using.
- The QuickBooks Letters, forms, and custom templates.
- Spelling Checker.
- Finance Statement Designer.
- Setting of the printer.
- Advance reports.
- Statement writers.
- The Business Planner.
- Cash Flow Projector.
- QuickBooks loan manager
Data that cannot be Transferred using the tool
The following type of QuickBooks Data cannot be transferred using this tool:
- QuickBooks ulti-user mode setup
- The company files which are older than three, can’t be transferred.
- The synchronizing of payment and payroll.
- Intuit Data Protect.
- Backup Files.
Where can I Find the Migration Tool?
The following steps can be followed to easily go to the migration tool:
- Sign in to the QuickBooks Online via Internet Explorer.
- Type https://app.qbo.intuit.com/app/exportqbodatatoqbdt in the URL bar.
- Further, go to the Export Overview screen and hit the button to Start it.
- Click on the download tool button in QuickBooks and download the migration tool.
- Launch the installer once it is downloaded.
- Finally, follow the on-screen instructions and wait until the installation process is done.
Process of Migration using QuickBooks Desktop Migration Tool
Below are the steps for transferring the QuickBooks Data from an old computer to a new computer by using the migration tool. Follow these steps:
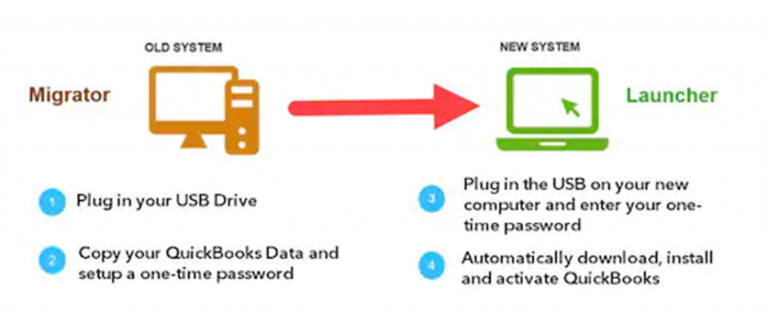
The process to be followed on the Old Computer:
Follow the steps listed below after launching your old computer.
- Connect the USB flash drive to your old computer.
- Then launch the QuickBooks Desktop.
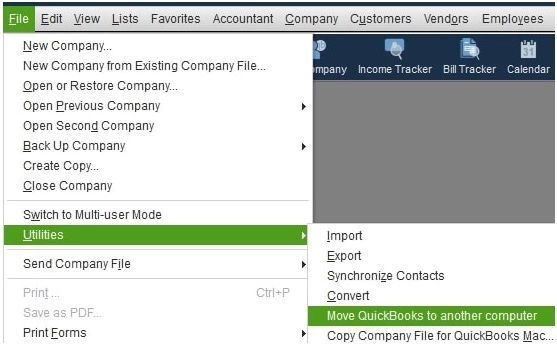
- Furthermore, go to the File menu and click on it.
- Then in the drop-down section opt for the Move QuickBooks to another computer option.
- Then select the I am Ready option and create a unique password.
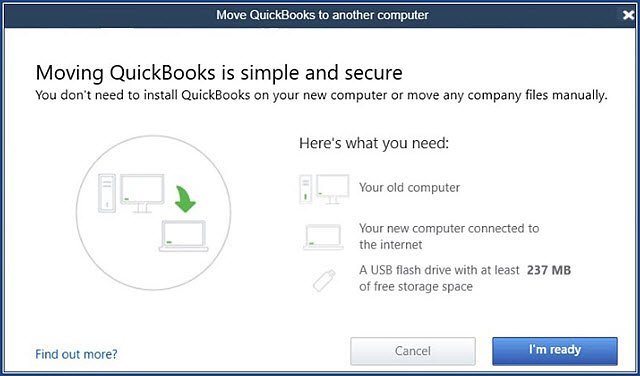
- Follow the on-screen instructions and choose USB flash drive.
- Now you must wait until all the files get copied.
The process to be followed on the New Computer:
Follow the steps listed below after launching your new computer.
- Connect the USB flash drive to your new computer.
- Note that the toll will not get launched automatically.
- Open the USB flash drive on your new computer and double-click on the Move_QuickBooks.bat file.
- Enter the password that you have created on your old computer.
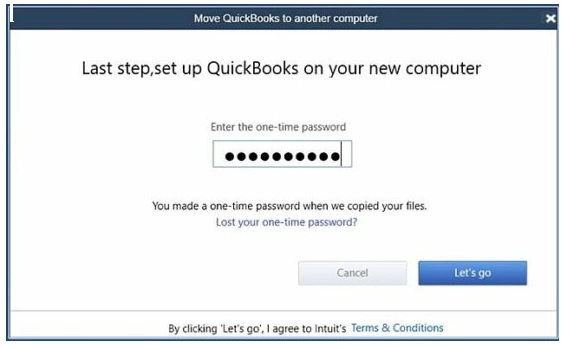
- Once you have done this much, wait until the migration tool is done with its process.
Additional Tasks to Complete the QuickBooks Setup
The data cannot be copied without the migration tool. So, in that case, we need to perform some more steps to complete the transferring task.
- Log In to the payment and payroll services.
- Log in to the Intuit Data Protect.
- Configure your entire backup schedule.
- Take the backup of the company files so that you can avoid unexpected issues or problems that can arise in the future.
Also Check This Out: QuickBooks Desktop 2024: Download, Features and System Requirements
How Can I Manually Transfer the Data?
You can use the following steps to transfer QuickBooks data manually from the Old Computer to your New Computer.
- Create a backup of QuickBooks on your old computer.
- Then you have to uninstall QuickBooks from your old computer.
- Moreover, launch your new computer and install QuickBooks on it.
- Finally, restore all the QuickBooks Backup that you have created on your old computer.
What to do After Migration of QuickBooks Desktop?
The following steps are to be followed after the migration of QuickBooks Desktop is done.
- Sign in to your payroll and payment services.
- Sign in to Intuit Data Protect and set up the backup schedule.
- Now you can transfer any company file from the old system to your new computer.
Note: Always take a backup of your company file before doing any process whether resolving an error or transferring it from one place or device to another.
What is the Easy Way to Migrate Data to QuickBooks Online?
The following ways are the easiest ways to migrate data to QuickBooks Online.
- Select the Plan.
- Furthermore, sign Up for QuickBooks Online Essential.
- Upload the complete data on the system.
- Complete the conversation given by Intuit.
- Upload the backup of the data.
- Now Migrate the data.
- Lastly, press the review button.
Also Read: QuickBooks Desktop 2023: Improved Features, Pricing, Release Date and Download
Conclusion:
As we come to the end of this blog we hope that you find this blog helpful for you. By reading this blog you can now easily set up and start using the QuickBooks Migration Tool. This is a must-to-use tool if you want to move QuickBooks to a new computer. This tool is important to ensure the safety and security of your essential data and company files. For more information, you can contact us. You can contact our QuickBooks CPAs by dialing our support line number i.e. +1-844-539-0188.
FAQs Related to QuickBooks Migration Tool
Why would QuickBooks migration fail?
The error may occur for a few reasons. These include trying to transfer unsupported file types using the QuickBooks Migration Tool, damage to files related to the Migration Tool, not meeting the minimum system requirements, system-related issues, or using outdated versions of QuickBooks or the Windows Operating System.
What are the 3 primary ways to migrate data to QuickBooks Online?
There are three ways to get client’s QuickBooks data into your QBO company:
- Manually enter the information.
- Use IIF files.
- Use the service of a conversion expert.
Can I migrate QuickBooks Online to desktop?
Click the Download tool to download the QuickBooks Desktop migration tool. Once you download the tool, launch it to install and choose Next. Accept the terms in the license agreement and click Next. Choose Complete as the type of setup, then Next.
What happens if data migration fails?
Migration failures can lead to several different results. Most frequently, migrations fail in terms of the projected budgets and timelines, with companies spending more than expected and taking longer to get to the new environment. Both have tremendous business impacts. But more technical failures also occur.
Other Related Articles:
Repair QuickBooks Desktop for Windows
How to Resolve Locked File Errors in QuickBooks Desktop?
How to Fix QuickBooks Desktop Won’t Open Error After Windows Update?
