QuickBooks is the biggest accounting software working for the various business owners and serving them with the best facilities for bookkeeping and maintenance of accounts. For years, QuickBooks has been the noblest choice among its users. QB deals with the transactions ensuring full safety to the accounts. Not only this, but it also has highly advanced and new features that make your tasks easier.
In this article, we will learn how to set up a multi-user network in QuickBooks desktop. You can discover the various processes to set up a network environment or a multi-user setup just by following the procedures given in this post.
You can also read: How to troubleshoot QuickBooks error qbwc1085?
Procedure to Set up Multi-User Network
QuickBooks program allows all its users to have multiple accesses to the data file all over the network. But, each user should install the QuickBooks software separately. Different versions allow different access like:
- QuickBooks Pro allows a maximum of 3 users to simultaneously access a file.
- QuickBooks Premier allows a maximum of 5 users to simultaneously access a file.
- Enterprise Solutions allows a maximum of 30 users to simultaneously access a file.
Conditions before setting up a Multi-user network
- Set up users for the Company file– Each user is advised to set-up the users before going for the Multi-User network.
- One should check the Windows file permissions– The user should log in as an admin to seek all the permissions.
- Always check your Database server manager– Remember to turn on the Database server before going to the multi-user network.
You may also like: How to Fix QuickBooks Error Code 392?
Steps to Set up Multi-User Network in QuickBooks desktop
Below we have provided few of the technical steps to set up the multi-user network in QuickBooks desktop. You can also take help from QuickBooks customer support team to save your precious time and efforts.
Step 1: Download and install the QuickBooks Desktop
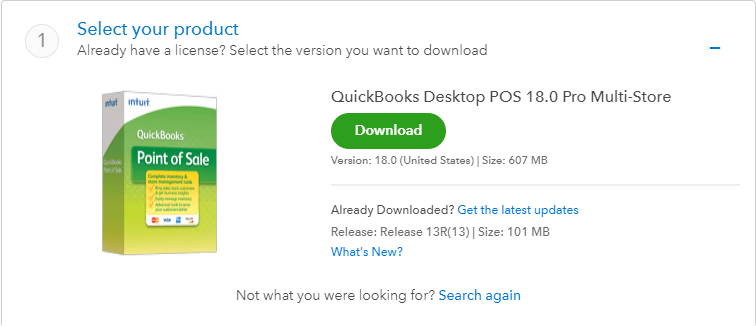
- First, Download the QuickBooks software and save it as a file.
- Then, Install the Software in the system.
- Choose the Multi-User host installation.
Step 2: Turn on Multi-user Hosting
- Open the QuickBooks software.
- Update the company file to a new version if required.
- Go to ‘file‘ > ‘Utilities‘ > ‘Host multi-user access‘.
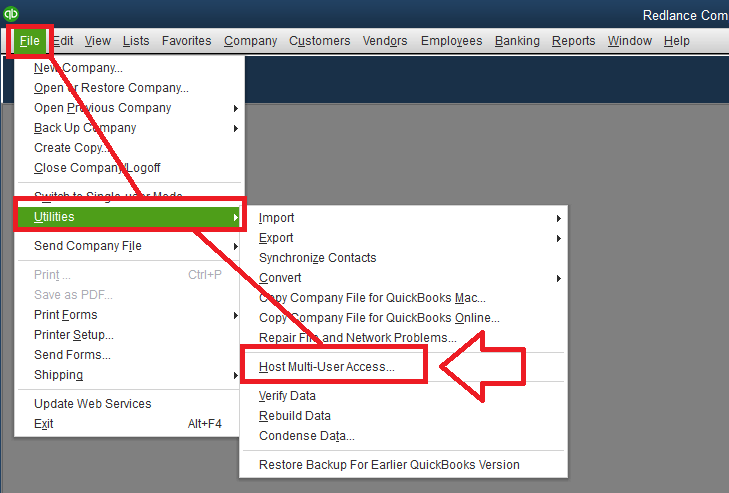
(Note: If you are already hosting multi-user set up then, directly move to the next step.)
Step 3: Turn on folder and Windows access permissions to share company files
- Right-click the folder that carries the company file
- Go to ‘Properties’ > ‘Select Security’ > ‘Edit’.
- Choose ‘QBDataServiceUserXX’ and select ‘Full Control’, then ‘Allow’.
- Click on ‘Apply’, and then click ‘OK’ button.
Set up Windows access permissions to share company files
- Press ‘Windows+E’ keys to open the ‘File Explorer’
- Find and right-click the folder containing your company files.
- Move to ‘Properties’ > ‘Sharing‘ > ‘Share Add’.
- Choose the corresponding ‘QBDataServiceUserXX’ for your version.
- Set the permission level of both users to ‘Full Control’ and then, click ‘Share’.
Step 4: Configure the firewall and security settings for the desktop
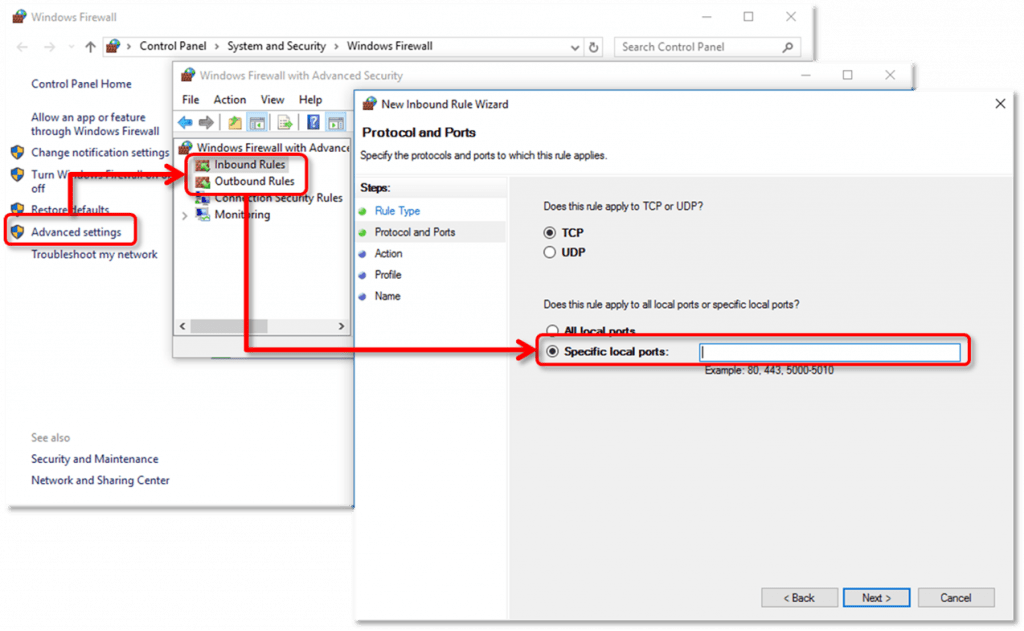
- Open ‘Start’ menu and search ‘Firewall’.
- Choose ‘Windows Firewall’ and select ‘Advanced Settings’.
- Right-click on ‘Inbound Rules’ and pick ‘New Rule’
- Click on ‘Port’ and then, ‘Next’ button.
- Check the ‘TCP’ option and type in specific ports needed for your QuickBooks year version.
- Make sure ‘Allow the Connection’ is selected.
- Check mark all the profiles and go ‘next’.
- Give the name to the rule and click ‘Finish’ when done.
- Open QuickBooks Desktop again in multi-user mode or over your network.
Step 5: Scan your file and Set up the QuickBooks database server manager
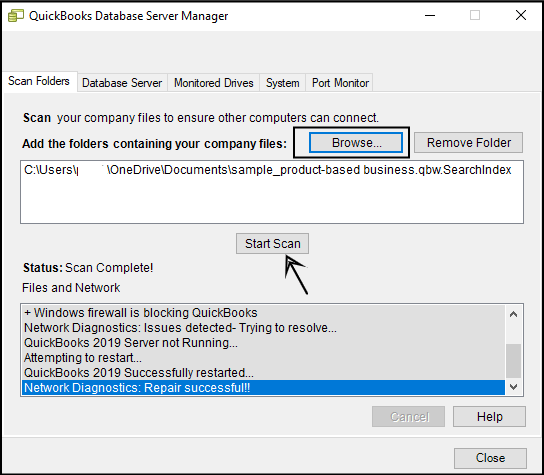
- Go to the ‘Start’ button > ‘Programs’ > ‘QuickBooks’.
- Then, Click the ‘QuickBooks Database Server Manager’.
- Pick the ‘Scan Folders’ tab.
- Click the ‘Add Folder’ button.
- Select the folder containing your company files and then click ‘OK’. Choose ‘Add Folder’ again to add additional folders.
- Press the ‘Scan button’ to begin the scan.
- Click close when the scan is completed.
Read Also: How to resolve QuickBooks Error code 77?
Steps 6: Add the Windows Admin Rights to allow the Configuration of Multi-User access
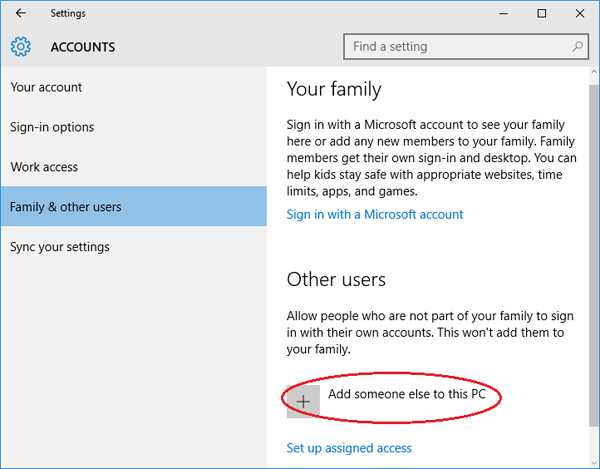
- Go to the ‘Start’ menu > ‘Settings’ > ‘Accounts’ > ‘Family & other users’.
- Then, select ‘Add someone else to this computer’.
- At the foot of the page, select “I don’t have this person’s sign-in information”, then Add a user without Microsoft account.
- Give a ‘New name’ and ‘Password’ to the account.
- Select ‘Finish’.
- Then, provide administrator privileges to the new user.
- Select the ‘newly created account’, then ‘Account Type’.
- Choose the ‘Administrator tab’ from the drop-down.
- Select ‘OK’ to save the changes.
For Windows 8 and 7:
- Press ‘Ctrl+R’ keys and open the ‘Control Panel’.
- Choose ‘User Accounts’ > ‘Manage another Account’ > ‘Create a new account’.
- Type in the user name, then select ‘Administrator’ and click ‘Create’.
Step 7: Open a company file located on a remote computer
- Go to the ‘QuickBooks File menu’ and select ‘Switch to Multi-user Mode’.
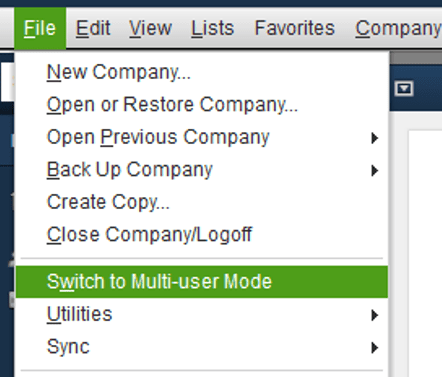
- Select ‘Yes’ in the Multi-user set up hosting window.
- Press ‘OK’ on the Multi-user setup information window.
- Add the required users by going to ‘Company’ > ‘Set Up Users’ and ‘Passwords’ > ‘Set Up Users’ > ‘Add User’.
You may also like: How to Resolve QuickBooks Payroll Error PS032?
Final words..!
The steps given above will surely help you to finish the Setup of the Multi-User network in the QuickBooks desktop. We assure you that following these steps according to your needs will definitely make the process easier.
We recommend you to talk to our professionals for any other query or doubt that you face during the process. You can consult with our QuickBooks premier support experts at i.e. +1-844-239-3583 and make the use of our expert’s knowledge. We are always there for your help.
