QuickBooks accounting software is loaded with tons of features and functionalities. However, its core element is the company file. Users might often find it difficult to create a company file from scratch. This company file basically carries all the crucial financial information of the company. Moreover, the QuickBooks accounting software allows users to save multiple company files for multiple businesses. But there should be a separate QuickBooks Desktop Company File for every business.
Creating a company file in QuickBooks is possible using a basic set of steps. As the company file stores sensitive information about the company, it is important to perform the right procedure. And in case the user isn’t having sound knowledge of the software, then he/she can feel free to consult our technical support professionals via our toll-free number i.e., +1-844-719-2859, and seek expert assistance.
Related Article: How to Troubleshoot QuickBooks Error 15215?
Steps To Create a New QuickBooks Desktop Company File from Scratch
Prior to starting the process, it is important to remember that if you are creating a new QuickBooks company file and already have an existing company file saved on the system, then it is important to use a different name for the new company file. Making use of the same name might overwrite the existing one and it would end up in losing the current data. Thus, be careful when saving the company file. To create a new company file, one can try performing the steps below. Let us have a look.
- The very first step is to open the QuickBooks software.
- And then, go for the option to create a new company file in the no company open window
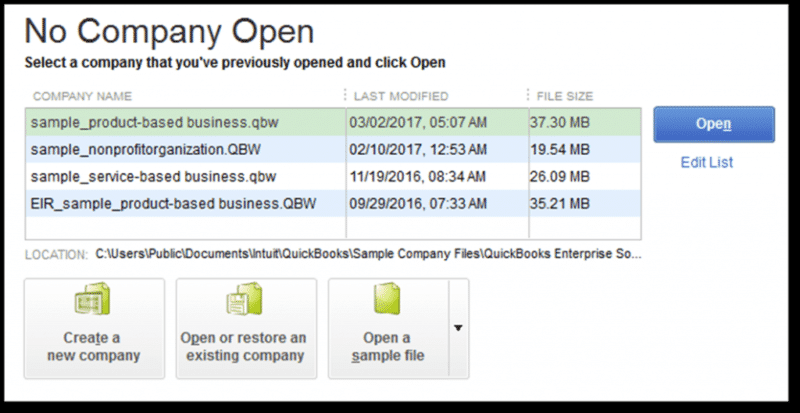
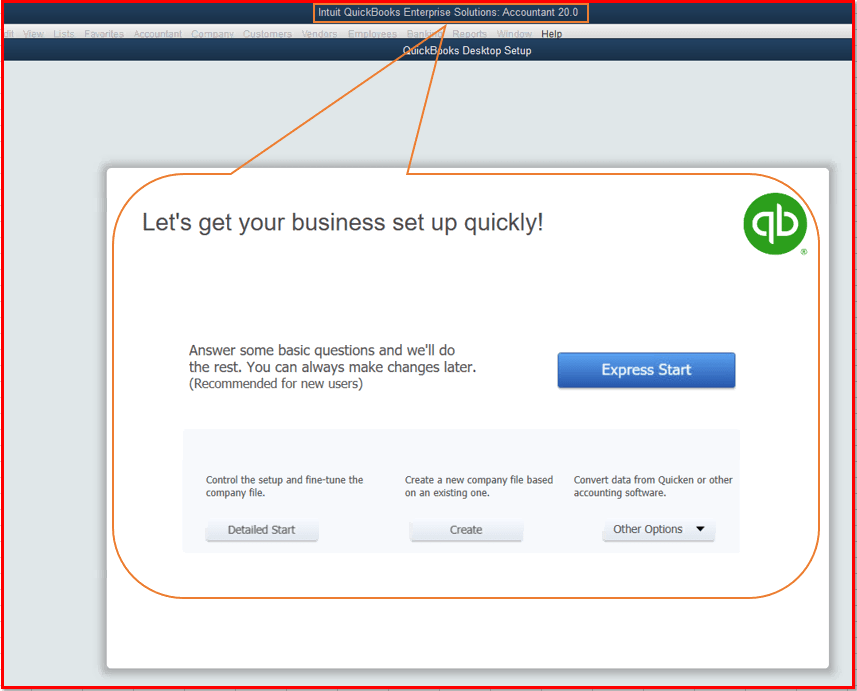
- The user will now have two setup options to choose from:
- The very first option is to choose the express start for getting it started. Here, the user will have to enter only the business name, industry, and business type in order to create a company file. One can also enter the info later on. The steps involved in this process are as follows:
- The user needs to first open the QuickBooks software.
- After that, click on the option to create a new company on the no company open window.
- Post that, click on the express start option.
- And further, enter the information in the QuickBooks setup.
- Make sure to click on the help me choose option to see a description for every business type and the chart of accounts that QuickBooks will create for you.
- Now, click on the create company option.
- Followed by, creating the chart of accounts, customers, and services after creating the company file. One can also do it later by selecting the option to start working.
- Another option is to opt for a detailed start. This is suitable in case you wish to go for a complete setup, where you will have to enter all of the info from the start. The steps involved in this process are:
- The user needs to open the QuickBooks software at first
- After that, on the no company window, select the option to create a new company
- And then, click on the detailed start.
- Once done with that, enter the details on the screen and click on next.
- Now, select the industry type and click on next.
- You are then required to spot the type of business entity and click on next again.
- After that, set the fiscal year for which you want to create a QuickBooks Desktop Company File and then click on next tab. You are now required to setup the QuickBooks admin password and then click on next again. Choose the location, save the company file and click on save.
- End the process by customizing the software by clicking on next or do it later.
- After picking the option, perform the onscreen steps to complete the setup.
- And also ensure that you assign a unique name to the file.
- You can now start working on your company file.
Related Article: Steps to Open QBW File Without QuickBooks Desktop
Start a new company file in QuickBooks
As we mentioned earlier, the QuickBooks accounting software allows you to create a new company file at the end of the year. And this doesn’t require you to enter the data that you would usually enter when setting up a new QuickBooks Desktop Company File from scratch. It should be noted that closing a company file at the end of the year is not mandatory, but a few users prefer doing that. QuickBooks users select the option to close their company file to avoid a stockpile of transactions over the course of years. This would further result in larger data files and might hamper the system’s performance.
Is it beneficial to create a new company file at the year-end?
There can be plenty of benefits of creating a new company file. Let us check out some:
- Making a new company file at the end of the year ensures that the system doesn’t get damaged due to large company files.
- It further provides an extra layer of security against accidental data tempering.
- One can also use this feature to restructure and clean up the current data by removing the unused, accounts, and names.
Important things to do before starting a company file
The user will have to perform the below set of steps before creating a company file. It is important to print the reports mentioned below on December 31st of the closing year. These reports will be needed when you will recreate the year-end balances of the account receivables and accounts payable in the new company file. Furthermore, these reports are important while recording the opening balances for all the balance sheet accounts. Not just that, you might require to manually enter the outstanding banking transactions, stock status, and inventory values.
Customer balance detail report
- Here, you are required to head to the reports menu
- And then, head to the customers and receivables option and select the customer balance details option.
Vendor balance detail report
- Here, move to the reports menu.
- After that, choose the vendors and payables.
- Also, select the vendor balance details option.
Standard balance sheets
- Under this, you are required to navigate to the reports menu.
- After that, go for the company and financials and choose the balance sheet standard option.
Also Check Out: How to Resolve QuickBooks Error 6000?
Steps To Create a New Company File in QuickBooks Pro and Premier
If you are a QuickBooks pro or premier user, then you might have to perform the below set of steps. It should be noted that the steps for pro and premier might vary from the above one. Let us have a look:
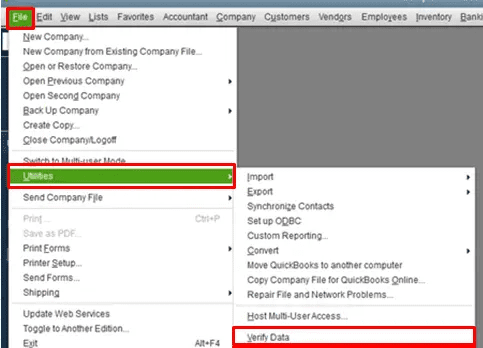
- The very first step is to head to the file menu and select the utilities tab and then click on the condense data.
- After that, rebuild the outstanding balances in the accounts receivable either by recreating individual invoices or by creating a balance forward invoice for a lump sum customer balance.
- The next step is to head to the vendors menu and create all vendor balances along with the enter bills options.
- The bills will be directly charged to the un-categorized expense account.
- Note that the payroll users can not avail of this feature due to critical payroll information in the payroll files.
- Moreover, the same feature is not available for QuickBooks online banking users, due to the security and time-related data from the financial institution.
Read Also: How to Fix QuickBooks Error 80070057 While Opening a Company File?
For professional assistance call us now!
Now that you have learned the steps to start and create a new company file, it is time to implement those steps and successfully create a new company file in QuickBooks. However, if you are stuck at some point in time, or if you require our assistance, then, in that case, consult our tech support professionals at +1-844-719-2859 and they will provide you with immediate support and assistance.
Other helpful articles:
How to Fix QuickBooks Error Code 6190 and 816?
How to Install, Download and Use QuickBooks Connection Diagnostic Tool?
