
Are you wondering when and how to give a credit memo or delayed credit to the customer? Don’t worry because we are here to help you with that. Sometimes, instead of refunding few of the customers prefer getting a credit that can be used to reduce the balance of their next invoice. There are several ways to manage credit memos in QuickBooks. There are two options to do this: Create a credit memo to reduce a customer’s current balance immediately and another is to enter a delayed credit to use in the future. In this article, we are going to tell you how to create and apply QuickBooks Credit Memos. And we will discuss this topic in detail so keep reading till the end.
Note: If you are refunding the amount already paid by a customer, you must record a customer refund in QuickBooks by creating a refund receipt. However, if you have any questions or need professional advice, we always encourage you to contact our technical team at +1-844-719-2859. If you have any questions, we will respond immediately.
Also Read: How to Delete a Journal Entry in QuickBooks?
What is the difference between QuickBooks credit memos and delayed credits?
QuickBooks allows you to issue credits via credit memos or deferred credits. However, there are some important differences.
Credit Memo in QuickBooks
- A credit memo is used if the customer wants to instantly reduce their current open balance.
- It can also be used as a payment of an invoice by the customer. The customer can use the whole credit memo or a part of it.
- A credit memo is also applicable while recording the customer’s invoice payment.
- It is to be noted that if you don’t apply credit memos still they can impact sales reports.
Delayed Credit in QuickBooks
If you want to track a customer’s credit for future use and if they don’t want it to instantly affect their current open balance, then using a delayed credit might help.
- Customer can reduce their invoice balance by using their delayed credit.
- Customers can add delayed credits as a line item for future invoices.
- Delayed credits don’t impact any sales reports unless applied to invoices.
Also Read: Reconcile Payroll Liabilities in QuickBooks – Complete Guide
Steps to create and apply a QuickBooks credit memo
To create and apply credits, please follow the steps below:
Step 1: Turn on or turn off automatically apply for credits
- First, go to the Settings tab
- Select Accounts and Settings
- Now choose the Advanced tab and then select the edit option in the automation section.
- After that turn on automatically apply credits if you want to apply credits to customers’ balances or open invoices automatically.
- Then turn it off if you want to apply credit memos to open invoices.
- Lastly, save the changes and hit the Done tab.
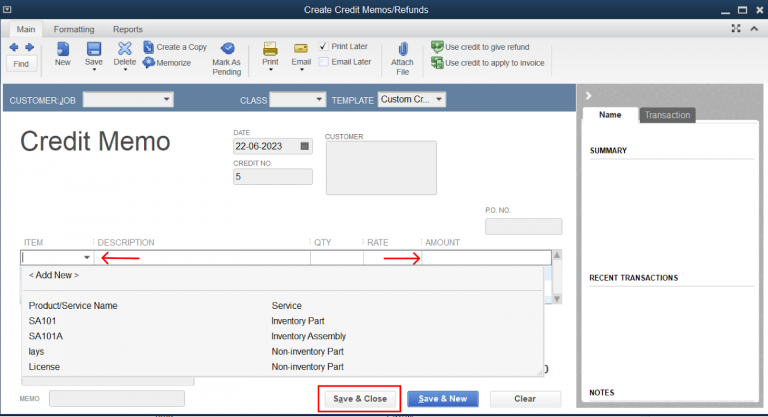
Step 2: Credit a Credit Memo
- First start with selecting the +New tab.
- Now choose the credit memo and then select the customer’s name from the customer’s drop-down menu.
- After that enter the credit memo details (date and amount).
Note: You can create a custom credit service item to quickly add it as a single line item to credit memos.
- The last step is to save changes and click on the Done button.
Step 3: Apply the QuickBooks Credit Memos to an Invoice
When you enable automatic credits, QuickBooks applies for credits. If you turn this off, you can manually add credits to your bill.
- Firstly, select the +New tab and select Receive Payment.
- Now select customer from the customer dropdown menu.
- If you want to apply the credit memo in the outstanding transaction section, choose the open invoice option.
- Now select credit memos in the credits section that you want to apply.
- Also note that if you don’t see the Credits section, no credits have been created.
- In the Payment column, enter the credit to apply to open invoices.
- Leave the payment method, reference number, deposit to and the amount received fields blank.
- Enter the pending details along with the payment date and ensure that the total is accurate after the credit memo is applied.
- Lastly, save the changes and close it.
You might also read: Fixing QuickBooks Compile Error in Hidden Module
Steps to create and apply a delayed credit
Follow the steps below to create and apply for a delayed credit.
Step 1: Create a Delayed Credit
- Start the process by selecting the + New tab and selecting the delayed credit option.
- Select the customer’s name from the customer dropdown menu.
- After that enter the credit memo details (date and amount).
Note: You can create a custom credit service item to quickly add it as a single line item to credit memos.
- The last step is to save changes and click on the Done button.
This saves the delayed credit and the next time you create an invoice in QuickBooks you are allowed to apply.
Step 2: Apply delayed credit to an invoice
Adding a late credit to an invoice from a previous billing period will affect the balance for that period.
- Start by selecting the + New tab and go for the invoice option.
- Now select customer in the customer dropdown menu.
- A window will pop up with all transactions from the customer and further include invoices and delayed credits.
- If you don’t see the window then choose a small arrow located next to the Invoice Balance due.
- After doing that find the delayed credit and select add option.
- It will add the credit to the invoice as a line item.
- The last step is to fill in the details and save the changes.
Customizing Credit Memos
Customizations made to the standard template are applied by the credit memos. Therefore, to customize your credit memos, you need to edit the standard template according to your requirements.
Also Read: What is QuickBooks runtime redistributable?
Conclusion:
Now while ending this segment we hope that you find this piece of writing helpful. The steps to create and apply credit memos in QuickBooks are practically proven accurate by certified experts. If you will apply these steps carefully you can easily create and apply the credit memos. However, in case you are struggling in performing the steps you can seek an expert’s assistance. To get assistance contact our CPAs and they will help you. Our CPAs are available 24/7 to assist you. Dial our toll-free number i.e. +1-844-719-2859 and get in touch with our experts.
Frequently Asked Questions
If a customer pays more than they should, or if they return a product, request a refund, etc., you can use a credit note in QB.
You can create a credit note to immediately reduce a customer’s current balance. Alternatively, you can enter delayed credits for future use.
Issuance of credit memos affects sellers and buyers in many ways, including accounts receivable and payable balances, revenue recognition, inventory valuation, cash flow, and balance sheet reporting. Affects accounting treatment.
Go to the Customers option and select Create Credit. Next, click Customer and enter the item you want to give credit for.
Other Articles to Read:
How to Fix QBDBMGRN Not Running on this Computer?
How to Create and Open Portable Company Files in QuickBooks Desktop?
