
Creating a journal entry in QuickBooks is an easy task. However, at times, one might end up in making a wrong entry mistakenly. In such a scenario, it becomes crucial for you to either delete the entry or reverse it. Reversing a journal entry usually reverses the impact of the same. Whereas, if you do not want an entry and have created it mistakenly, then you have an option to permanently delete a journal entry in QuickBooks. Both QuickBooks online and desktop users can create, delete, and reverse a journal entry. However, the steps to be performed in both cases might differ.
To help you out in successfully deleting and reversing journal entry in QuickBooks online and desktop, here we are with this segment sharing the complete steps that need to be implemented. In case you need any sort of technical guidance for deleting journal entry in QuickBooks, reaching out to our technical support team at +1-844-719-2859 might help. Having said that, let us explore further about deleting a journal entry in QuickBooks desktop and online.
Also Read: What is QuickBooks runtime redistributable?
Quick points to remember before deleting a journal entry in QuickBooks
Reversing a journal entry is different from deleting it permanently. It is important to understand the difference between the two, before taking any action.
- Reverse a journal entry in QuickBooks – This can work if you need to allocate a transaction between two accounting periods or fix a debit/credit error.
- Delete a journal entry in QuickBooks – You can opt for this if you created a journal entry mistakenly and now want to get rid of it permanently.
Delete or Reverse a Journal Entry in QuickBooks Online
As we mentioned earlier the steps to delete or reverse a journal entry might differ in QuickBooks online and desktop. If you are a QuickBooks online user, then make sure to implement the steps listed below:
Reverse a journal entry in QuickBooks Online
Reversing a journal entry in QuickBooks online simply reverses the debit and credit and doesn’t delete the original journal entry. The steps you need to perform here are:
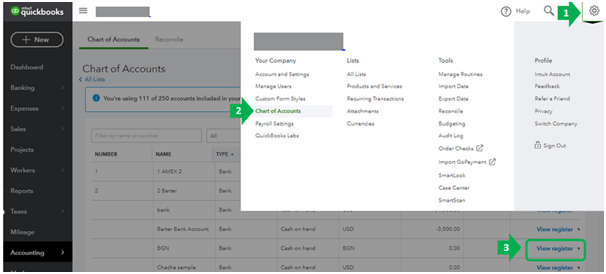
- Simply begin by selecting settings tab ⚙️ and then go for chart of accounts in QuickBooks.
- Furthermore, look for the account that you created the journal entry for.
- The next step is to choose account history.
- Once done with that, look for journal entry present in the account register.
- Note that, the word journal should be in the Ref no. or type column.
- You now have to select the journal entry to expand the view.
- And also, go for edit tab.
- The next step is to choose Reverse.
- And furthermore, go for Save.
Note that, when you reverse a journal entry, the software creates a new journal entry to balance it. This is just to keep a record of the change made.
Also Read: How to Undo or delete a Reconciliation in QuickBooks Online?
New Journal Entry has Different Information
It should be noted that, the new journal entry has a slightly different information than the previous one. This includes the following:
- The new journal entry carries the original journal number and further adds the letter R, which indicates reconciled.
- Moreover, it is dated the first day of the month following the original journal entry date.
- Another point is that, it keeps the same info like the Account, name, and description as the one in original entry.
Delete a Journal Entry in QuickBooks Online
When you delete a journal entry in QuickBooks make sure that you have rechecked whether you actually need to delete it or not, as this can quickly unblanace the accounts. In case you do not want to delete the entry, you can simply ask your accountant to create an adjusting entry for you, as this would eliminate the need for deleting it.
- For deleting a journal entry, you need to first head to settings tab ⚙️.
- After that, choose chart of accounts
- The next step is to find the account that you created the journal entry for.
- Followed by selecting account history.
- The user needs to then look for the journal entry in the account register.
- There should be journal word mentioned in the ref no. or type column.
- After that, choose the entry and click on expand to view.
- Click on delete tab and also select yes to confirm.
Also Read: How to Locate Missing Transactions in QuickBooks Desktop?
Delete or Reverse Journal Entry in QuickBooks Desktop
If you use QuickBooks desktop, then here are the steps that you will have to implement to delete or reverse a journal entry in QuickBooks Desktop.
Delete a Journal Entry in QuickBooks Desktop
- Begin with heading to the company menu.
- After that, select make general journal entries.
- The next step is to find and select the journal entry that you wish to delete:
- Now, in QuickBooks for windows, go for find and enter the name, date, entry no., or amount and select find.
- For QuickBooks for Mac, you need to select journal entry you wish to reverse from the list on Make general journal entries window.
- To delete the journal entry:
- You simply need to double click the journal entry in QuickBooks for windows and then select delete or void and click on ok tab.
- In QuickBooks for Mac, select delete general journal from the edit menu.
- At the end, you simply need to go for save and close.
Reverse a Journal Entry in QuickBooks Desktop
In order to reverse a journal entry in QuickBooks desktop, perform the set of steps listed below:
- Head to the company menu initially, and select make general journal entries.
- Once done with that, find and select a journal entry that you want to reverse.
- In QuickBooks for Windows: You need to go for find and enter the name, date, entry no, or amount.
- If you use QuickBooks for Mac, then simply select find and the journal entry you wish to reverse on the left side of Make general journal entries window.
- Head to the reverse option.
- And also, choose save and close.
You might find this helpful: What is QuickBooks runtime redistributable?
Conclusion!
Now that you know what measures can be taken to delete or reverse a journal entry in QuickBooks online and desktop, it is time to implement these steps manually. However, if you have any queries or if you are stuck at any point in time, then contacting our technical support team at +1-844-719-2859 is something we recommend. Give us a call and let our certified ProAdvisors help you with your queries.
Scheduled Backups Are Not Working in QuickBooks- Quick Fixes
How to Setup QuickBooks Desktop Loan Manager?
