Do you face issues in scheduling automatic backups because of failure? Well, this is a common problem faced by many users while scheduling backups. The best thing about scheduling backups is that it is the best and most effective feature to prevent any data loss. This situation may occur in QuickBooks like an error with a warning message: Scheduled Backups are not working in QuickBooks. By using this feature one can schedule a QuickBooks backup easily. But for any reason this feature fails to do so, it can lead to heavy data loss.
So, to protect this kind of problem we have curated this article for our users. In this article, we have described the measures to overcome this issue. In case you find this issue confusing you can seek expert assistance. You can reach out to our QuickBooks CPA by dialing our toll-free number i.e. +1-844-719-2859.
Here is: How to Fix QuickBooks Unable to Backup Company File Error?
What are the Causes of Scheduled Backups are not working in QuickBooks issue?
Below we have mentioned the most common reasons that can trigger this issue. Read the points carefully as they will help you resolve this problem further.
- One reason can be that you are using an outdated version of QuickBooks.
- If the Windows operating system is not compatible with the version of QuickBooks. Check supported versions of QuickBooks with windows 10
- The QuickBooks company file or data is corrupted.
- Also, if you are having an unsuitable setup of scheduled backups.
What are the Methods to Fix Scheduled Backups Are Not Working issue?
Let’s now come to the methods to be taken to fix this issue. We have curated the best methods for you with their respective steps.
Method 1: Download and Update QuickBooks to the Latest Version
Follow the steps given below carefully.
- Firstly, open QuickBooks and click on the Help menu.
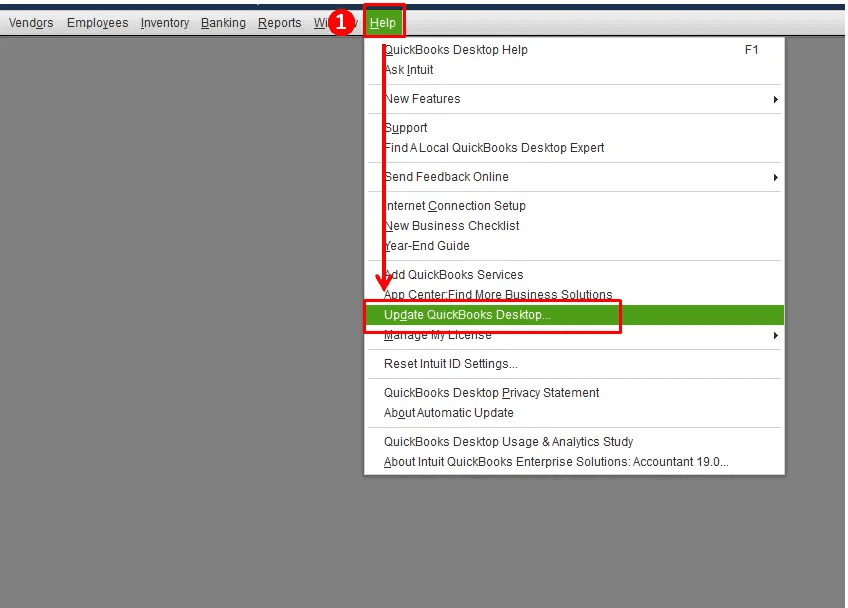
- Then update QuickBooks to the latest release by selecting Update QuickBooks Desktop.
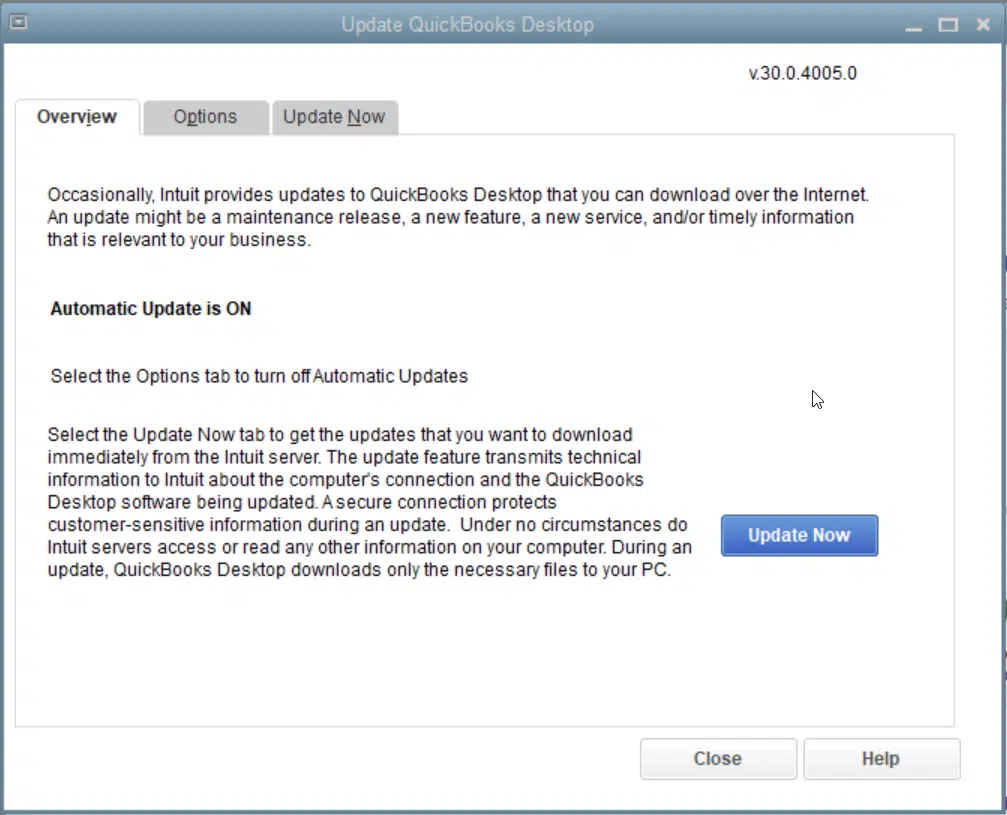
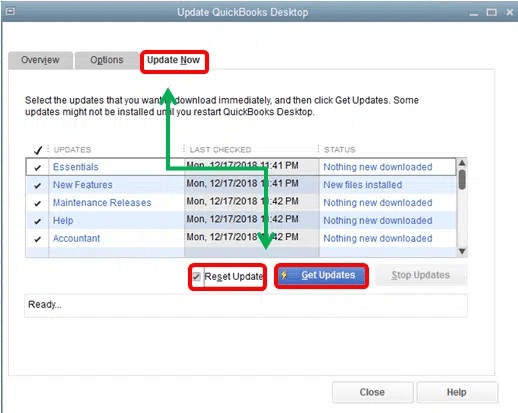
- Now hit the Update Now tab and select Reset Update Box to clear past updates.
- After this click on Get Updates to start the downloading.
- Once the download is complete, restart the software.
- Finally, click on the Yes tab when asked to Install the new update.
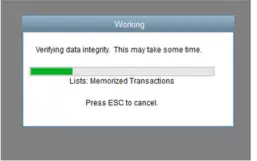
Method 2: Run QuickBooks Verify and Rebuild Data Utility
If the first method didn’t help much, try to verify and rebuild data in QuickBooks. The steps involved in this process are:
- Open QuickBooks and click on the File tab.
- Now choose Utilities and hit the Verify Data option.
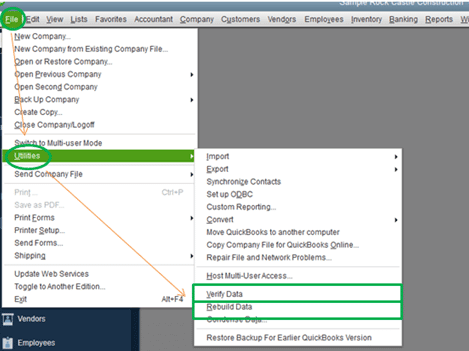
- You have to choose QB scan all the company files and data options and then check for damage.
- A popup will appear with the message: Data has lost integrity. Now close the message and click on the File tab again.
- Here, a window will open asking to backup company data on your screen. Click OK button on that window.
- Then the tool will repair your damaged company file.
- Once the process is complete you will see a message: Rebuild has completed. Then hit the OK button and try scheduling automatic backup.
Also Read: How to Open and Use a Secondary Company File in QuickBooks Desktop?
Method 3: Check for Automatic Scheduled Backup Settings
- Open the QuickBooks and click on File menu.
- Opt for Save Copy or Backup Windows for opening the workflow.
- Go to the Backup option and click on the Next button.
- Now click on options and set the backup defaults if not set up already and click the Next button.
- Then select the Change Location tab or Use this Location and hit the Next button.
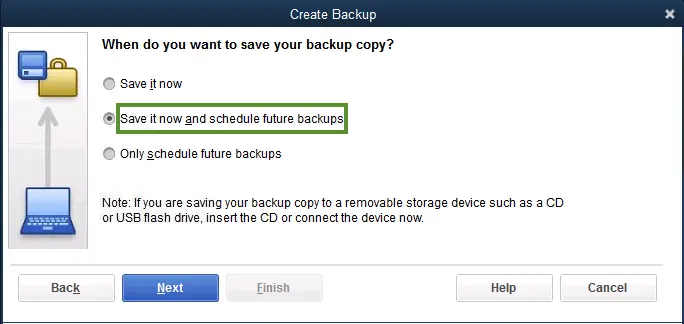
- Here, click on the Save it now and schedule future backups option and hit the Next button.
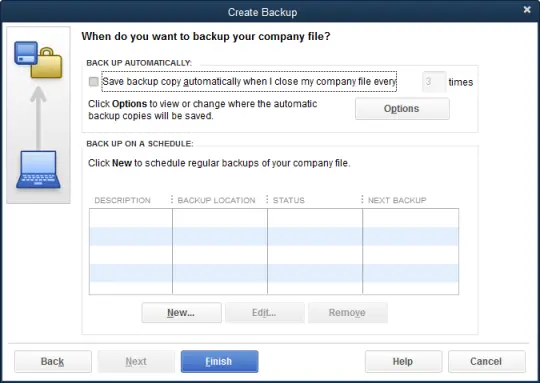
- After that select Save backup copy automatically when I close my company file every (number) times box.
- Lastly, fill in the number in the provided field and hit the Finish tab.
Method 4: Run QuickBooks in Compatibility Mode for Windows Version
- Open the system and right-click on the QuickBooks icon on the desktop.
- Choose the properties option.
- Check for the Compatibility tab and tick mark the Run this program in Compatibility mode.
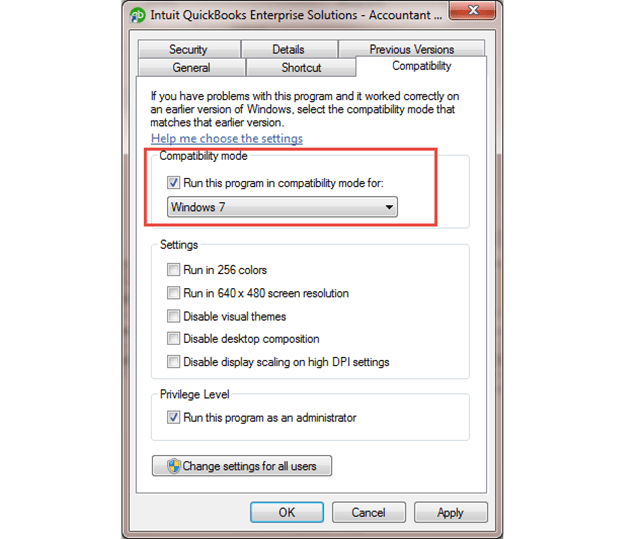
- Then choose the Windows Version by clicking on the drop-down menu.
- No hit the Apply button and click on OK tab.
- 5th Method: Setup Windows Operating System to Windows 10
- Open the Task Scheduler in Windows 10 and click on Task Scheduler Library in the Task Manager.
- Now scroll down till you see the QuickBooks backup task and right-click on it and select properties.
- Access the task properties.
- Look for the Configure for option in the General tab.
- Now pick Windows 10 in the drop-down menu.
Note: After changing Configure to setting to Windows 10 some users experience backup failure. Also, they might come across a message QBBackup.log file: QuickBooks encountered a problem attempting to backup C:\DATABASES\QB_XXXXXXX\XXXXXXX.qbw – Drive specified could not be accessed. Error ID 202: Last System Error: The computer cannot locate the specified path. This error can be fixed using the Run Only When User is Logged in option under QuickBooks.
Also Read: How to Restore QuickBooks company file from the local backup?
Conclusion:
We hope that after reading this article you know what to do if scheduled backups are not working in QuickBooks. The methods that are mentioned above with their respective steps are the most effective ways to overcome this issue. However, if you still get confused while applying these steps you can seek expert assistance. You can directly call our QuickBooks certified ProAdvisor for a helping hand. Just simply dial our toll-free number i.e. +1-844-719-2859. We are available 27/7 to help you. Please feel free to contact us anytime around the clock.
FAQs Related to Scheduled Backups are not Working in QuickBooks
How do I back up my QuickBooks company file?
To back up your QB company file, use the built-in backup feature.
1: Open QuickBooks.
2: Tap File menu > Select Backup Company > Create Local Backup.
Next, you must follow the on-screen instructions to select the backup option and save the file to a safe location.
What should I do if QuickBooks backup failed?
If your QuickBooks backup fails, try the following steps.
- Check whether there is enough disk space.
- Check the file location and file name length.
- Try repairing your QuickBooks installation.
- Use the QuickBooks File Doctor tool through the Tool Hub program.
How do I repair a QuickBooks backup file?
To repair a backup file, follow these steps.
- Open the QuickBooks program.
- Then go to File and select the Open Company or Restore Company option.
- Next, select the Restore Backup option and follow the on-screen instructions to locate and repair your files.
How do I change the backup settings in QuickBooks?
- To do this, you need to select QuickBooks and decide on the settings.
- Next, you need to click “Backup” and decide on your backup settings.
- Automatically back up your company’s files.
- How do I enable online backup in QuickBooks Desktop?
- You must select the File menu, hover over your backup company, and select Configure/Enable Online Backup.
- Also, sign out in the Intuit privacy window.
- Make sure you are logging into your IDP using the same credentials shown as your email ID.
- Also, click the OK tab.
