
Transferring or uploading your accounting files in QuickBooks Desktop is an easy task. Are you also wondering how to do so? This can become easy by using Intuit Customer File Exchange. Let’s read this article till last to know how to download and upload files using Intuit Customer File Exchange. This feature enables data Synchronization and data exchange between QuickBooks and various other programs. But if you find using this platform a bit confusing you can contact our tech support team anytime. Our certified QuickBooks experts will get in touch with you to help out. For any further queries and any glitches, you can call us immediately. To get in touch with our team dial our toll-free number i.e. +1-844-539-0188.
Also Read: How to Fix: Can’t Back up with Intuit Data Protect Login Issue?
What is Intuit Customer File Exchange?
Intuit Customer File Exchange is a platform that is offered by Intuit for its users. This platform helps a user to exchange company files securely and without any difficulty. By using this platform users can also download and upload accounting data files to and from the servers of Intuit. It also offers data privacy and security to the users. Transferring data like Transactions, Lists, Reports and Invoices, etc. becomes easy using Customer File Exchange.
Contact Intuit For Your PIN
To send a file to Intuit or QuickBooks File Exchange, the first thing you need is a secure Personal Identification Number (PIN). You can find this PIN in the email from Intuit and it usually expires within 48 hours. After getting the PIN you can move ahead. In case the PIN is not working you can contact our CPAs for assistance.
What is the Procedure to Upload Files Using Intuit Customer File Exchange?
A user can upload any file in any file format while sending the same file to Intuit. In case the file you are uploading with the same name can replace or overwrite an existing file. So, you need to backup QuickBooks company file to keep your file secure.
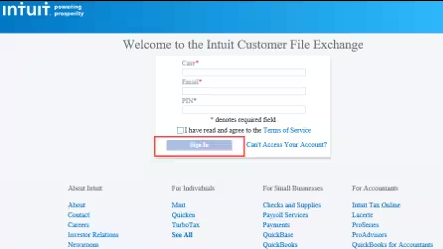
- The first step is, open the web browser and sign in to https://intuitb2b.secure.force.com/FileExchange. Make sure you are using a supporting browser.
- Now enter the case number, email and PIN correctly.
- You will see a popup. In that, you have to accept the terms of service and click on the sign-in option.
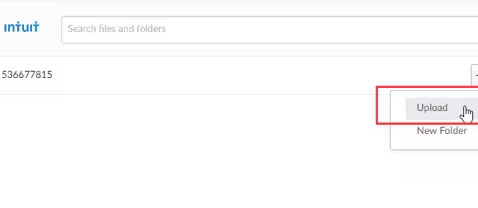
- Now choose the + tab located at the top right of the case number and hit on the Upload tab.
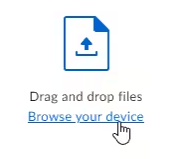
- Now go to browse your device and select the file you want to upload.
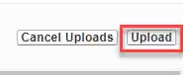
- Now click on Upload and close the tab after the files are uploaded.
What is the Procedure of Downloading Files from Intuit Customer File Exchange?
Now as you have uploaded the file, let’s move on to the steps to download files from Intuit Customer File Exchange. This File Exchange is a corrected data file and you can retrieve it by using the steps listed below.
Note: You have to download the files also as they are removed from the portal after 20 days.
- Sign in to the Intuit Customer File Exchange.
- Like above enter the case number, email and PIN.
- Note: Pin is case sensitive and you have to contact a professional in case you lose it.
- Same as above a popup will appear in which you have to accept the terms of service.
- Now click on the sign-in option.
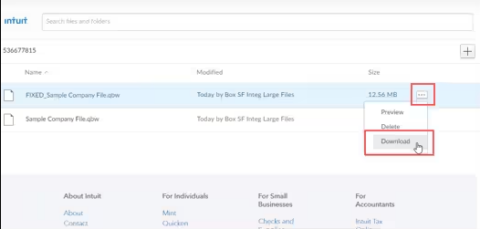
- Now go to the file and choose the file named as FIXED_.
- Now you will see 3 dots, select them and choose the download option.
- Now browse a favorable location where you want to store the file.
- Now at the end click on the Save option.
You might find this helpful: How to Change, Manage or Update your Intuit account with CAMPs?
Upload and Download Files from Data Services
- The user needs to download the Readme.docx named file. This file contains important information that is needed at the time of starting the process of using the repaired file.
- Now save both the data file and the readme.docx file in a folder so that you can find it easily later on.
- Now move further to the conversion process and note that the data file may have an extension (.qbb) that is a backup file.
- So, to covert the backup file in a full company file follow the steps listed below:
- Go to the file menu in QuickBooks.
- Choose Open or Restore option.
- Now select the Restore a backup copy option and hit the Next button.
- Now opt for the local backup tab on the circular box and hit the Next button.
- Now browse the file with the extension (.qbb).
- Now select a folder where you want to store the restored file and click on Open.
- Now click on Save and make sure if you see any overwriting the data message, pick the correct option.
Note: Don’t choose to overwrite the data until or unless it is required.
Conclusion
It is not a rock-hard task to Download and Upload the Files using the Intuit Customer File Exchange. It requires just a correct set of steps. We hope that this article will help you to download and upload your files easily now. If in case you get stuck somewhere and have any questions please feel free to contact our tech support team. You can ask for any QuickBooks-related assistance by contacting our team. Dial our toll-free number i.e. +1-844-539-0188 to get in touch with our team.
Other Related Articles:
How to Fix QBDBMGRN Not Running on this Computer?
How to Set up folder and Windows Access Permissions to Share Company Files?
QuickBooks Downloads Desktop – How to Download and Install
How to Create and Open Portable Company Files in QuickBooks Desktop?
