
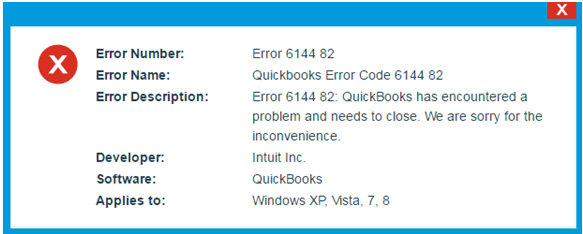
QuickBooks desktop software has completely changed the accounting industry. This software not only helps businesses with bookkeeping but, also improves productivity. Moreover, it attracts entrepreneurs with its most sought-after and amazing features. These features make it better as compared to other accounting programs. However, at the same time, this software is prone to certain errors. One of the most common errors reported by users is QuickBooks error code 6144, 82 or 6144, 304.
This article explains this error in detail. This error often occurs when you try to access the company file in QuickBooks Desktop. When this error occurs, you will not be able to perform tasks from the main system or any other system. Error 6144 can be easily fixed if you follow the steps below correctly. In various cases, you may need to close QuickBooks Desktop and disable your antivirus program on all systems. For more information, be sure to read the article and read each section carefully If you are facing the same issue, feel free to contact our premier support team by calling our dedicated helpline number +1-844-719-2859. Contacting our experts will be of great help in resolving your issue.
Read this also: How to access QuickBooks desktop remotely?
What does QuickBooks Error 6144 do?
QuickBooks error 6144 may keep you opening a company file and perform your work through both the main computer and any other computer. This is a QB company file error that may appear because of multiple causes. The causes and solutions of this error will be discussed further in this blog post. So, read on!
What causes error code 6144 in QuickBooks?
Many factors can cause the problem. We have written down some of the most common ones.
- Network issues, especially on the server or system, can cause this error.
- Corrupt Windows system files or QB-related program files are affected by a virus or malware infection.
- Another factor that causes error 6144 or error code 6144 82 can be the accidental deletion of QB-related files.
- Recent changes related to QuickBooks can cause corruption in the Windows Registry and eventually lead to errors.
- QuickBooks installation is incomplete or the download is corrupted.
What are the Symptoms of QuickBooks Error Message 6144?
Now that you know what causes this error, you also need to know how to identify it. When this error occurs, the signs and symptoms listed below are very noticeable.
- An active program crashes or the system crashes frequently while the software is running.
- Windows starts slowly and does not respond to keyboard or mouse input.
- The system may freeze for a few seconds.
- The error itself is displayed on the screen, but the error code has been slightly modified.
You may also like: How to Fix QuickBooks Error Code Skipped -111?
How to Resolve QuickBooks Error Code 6144?
Before we jump on to the solution part, there are a few important points that you should keep in mind while performing troubleshooting steps for QuickBooks error 6144.
- Make sure that you perform all the provided steps on the main system except the last step
- QuickBooks accounting software should be open and running on just the main system
- QBservice user depends on the MS Office version, for example, if you have Office 2013, you should have QBservice23
- Make sure that your antivirus is disabled before you start with the troubleshooting process
- You should be aware of the MS Office version you are using
The troubleshooting steps shall be first performed on the server computer and later on the other computers. There are chances that the error would get resolved by fixing it on just the hosting computer and in that case you would not have to do the same on the other systems.
You may also read: How to Fix QuickBooks Unable to Backup Company File Error?
Step 1: Start Service
- Click on the Start button on the keyboard on the desktop and then Services
- Select QBFCMonitoringservice
- The status of the service must show active and should be available in Automatic mode. If the settings are different, make the changes by choosing the appropriate radio buttons
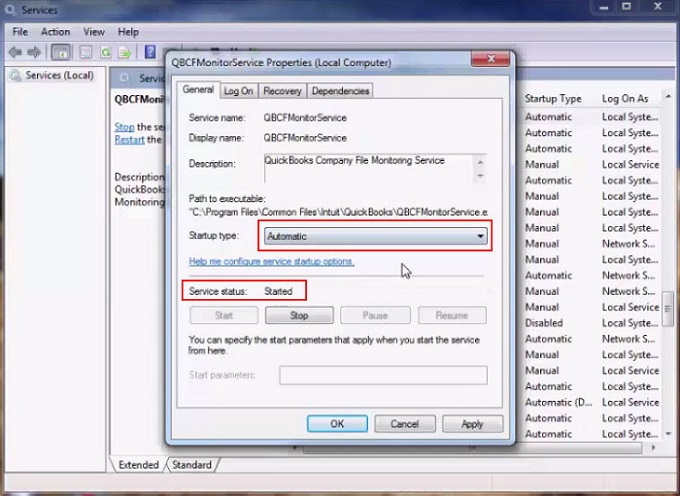
- Hit Apply and OK button
Step 2: Next, check the Administrator user and change the Account Type
- Go to Control Panel select User Account.
- Choose Add/Remove User Account and highlight QBDserviceuser23 (if you are an MS Office version 2013 user)
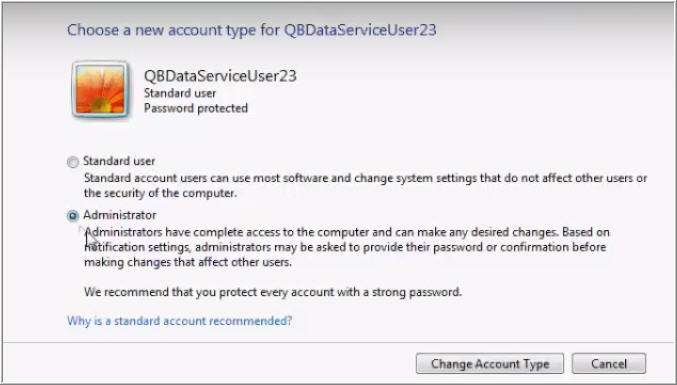
Important: The file name for QuickBooks 2014 users will be QBDserviceuser24 and for QB 2015 users it’ll be QBDserviceuser25 and so on.
Read this also: How to resolve QuickBooks Error 1016?
Step 3: Create a new folder by the name of QuickBooks
- Create a new QuickBooks folder and set the Read/Write preference to all the created folders. Go to C drive and create the following folders: 1. Administrator 2. Add User 3. Add System 4. Everyone 5. QB Data Service user23
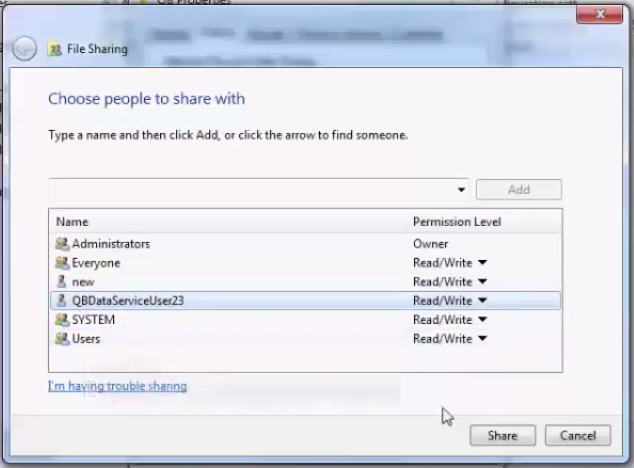
Once you create all the folders, give Read/Write permission to them all.
Step 4: Copy the Company File in the new QuickBooks
Sometimes, the files get corrupted or damaged due to their size and therefore do not open in QuickBooks. The company file should be named – Get Back to Business.
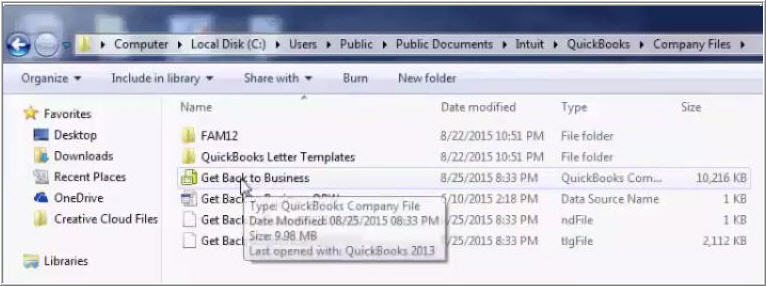
- Press Windows and E keys to open the Windows Explorer
- Open C Drive > Users > Public > Public Documents > Intuit > QuickBooks > Company Files and since this is the default file location in QuickBooks the company file should be there
- Copy and Paste the company file in the newly created QB folder
Read this also: How to resolve QuickBooks Error 12031?
Step 5: Create Inbound And Outbound Firewall Rules
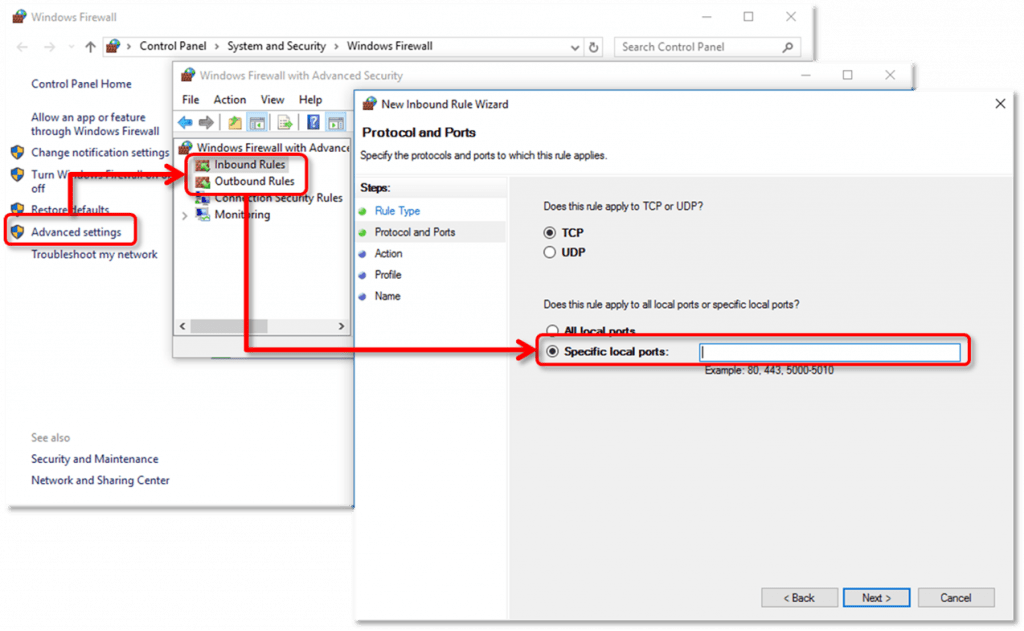
- Open the Windows Firewall settings of the main computer
- Go to the Advanced Settings, click Inbound Rules followed by New Rule and then Port
- Click Next
- Click on TCP and enter the port number of your QuickBooks version (the port number for QuickBooks 2013 users will be 8019, 56723, 55353-55357).
- Click Next
- Tap on Allow the connection tab and select Next
- Give a name to it like QB to remember it
- Click Finish
The Firewall Ports are determined by the QuickBooks version that you use. You should get in touch with your web service provider to learn about the firewall rules. You should add the Ports to all the computers along with the server computer.
Read Also: How to Reinstall QuickBooks for Windows using QB Install Tool?
Step 6: Add Ports to the new outbound rules
- Press the start button on the keyboard or desktop and click All Programs
- Select QuickBooks and then QuickBooks Database Service Manager from the drop-down list
- Click on Add Folder and find and add QB
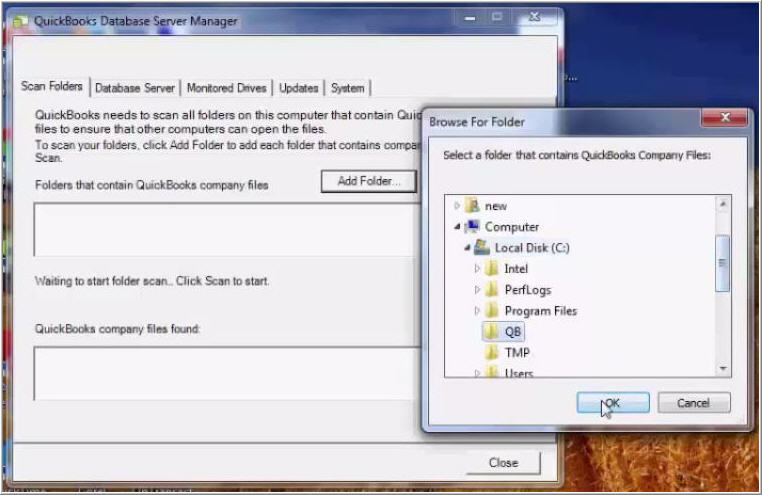
- Tap on the Scan tab and let the scan process take place
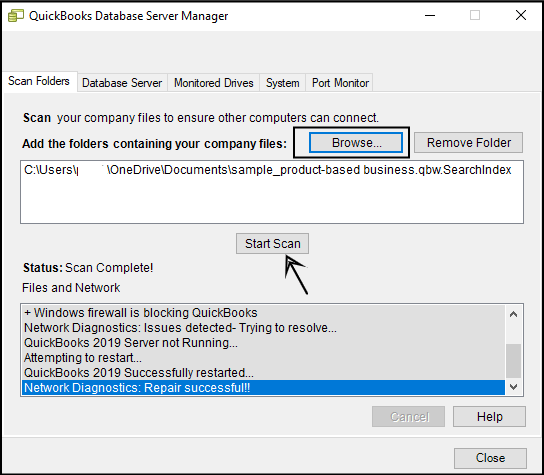
Important: You should remove any folder that is already there.
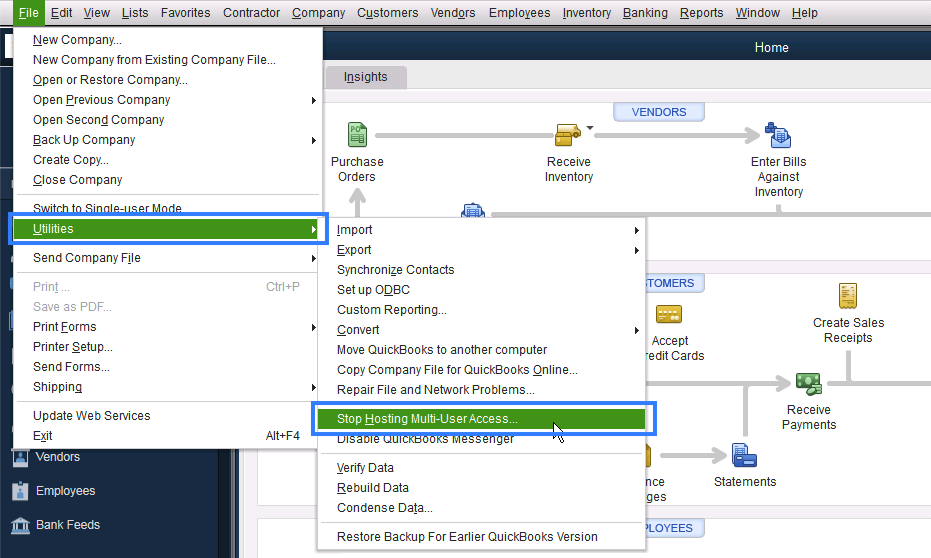
Step 7: Restore Company file on the main server computer
- Run QuickBooks accounting application in Multi-user mode on the hosting computer
- Follow the path: File > Open > open and restore existing company
- Select the Company file named Get Back to Business and click on Open to access the file in multi-user mode
- Go to File and ensure that the hosting is turned
- Go to Utilities and click Stop Hosting Multi-user access on Main Computer
See this also: How to troubleshoot QuickBooks error 6150?
Step 8: Next, open the Company File on local workstations.
You must know the IP address of the main computer to complete this task.
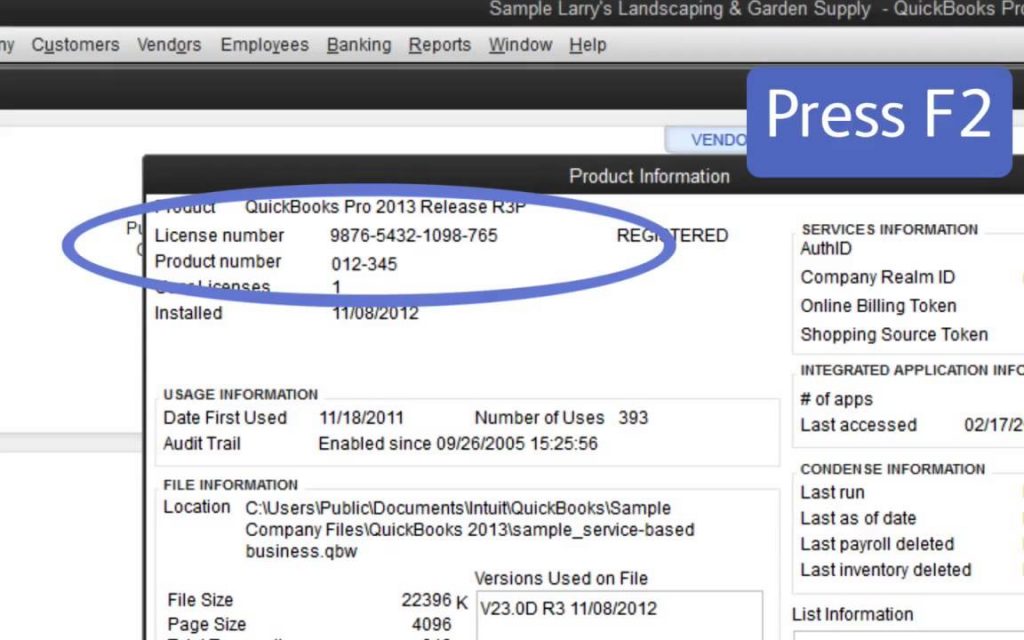
- Run QuickBooks on the server computer and press the F2 key on the keyboard.
- Open the Product Information window.
- Note down the IP Address (with prefix // before the IP address).
Step 9: Access Company file from other computers
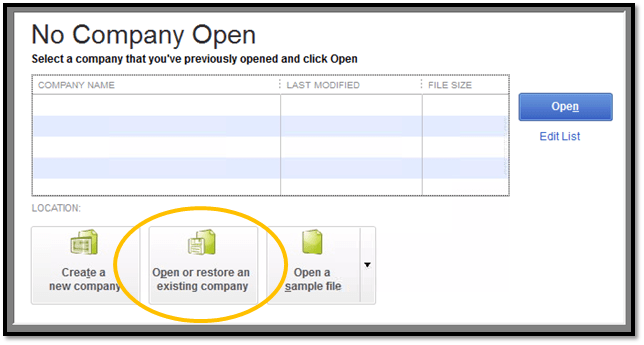
- Open QuickBooks and go to File > Open > Open or Restore an Existing File.
- Paste (Ctrl + v) the IP address with the backslash in the file name
- Do check the Open File in Multi-user mode box
- Go to the newly created QuickBooks folder
- Select the QB Company File and open the file. Repeat the same step again on all computers running the accounting application.
Read it also: How to Fix QuickBooks Unable to Backup Company File Error?
Alternate methods
In order to resolve QuickBooks error 6144 you can also apply following steps:
Step 1: Rename the files. TLG and.ND efficiently
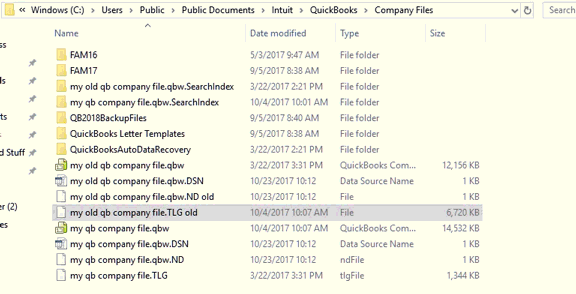
- To begin with, the user needs to first press the F2 key in QuickBooks desktop
- And after that navigate to the file information and look for the location of the company file
- Moving ahead, the user needs to open the file location once it is obtained
- After that search for the entire files .ND and .TLG extensions that share the same name as the company in question
- To end it, the user needs to rename them by adding a .OLD at the end of each of the files
Step 2: Use the QuickBooks File Doctor tool.
You can easily fix the error by downloading and using the QuickBooks File Doctor tool. This tool was designed and developed to self-diagnose and fix QB errors. All you need to do is download the tool from the Tools Hub program, install it on your system, and run it.
- First, close the QuickBooks program.
- Next, download the latest version of QuickBooks Tool Hub from here.
- Next, you need to open the downloaded file “QuickBooksToolHub.exe”.
- To install the Tool Hub software on your system, right-click QuickBooksToolHub.exe and tap Run.
- The next step requires you to follow the on-screen instructions to install the software and agree to the software’s terms of use.
- Once the installation process is complete, you must double-click the Tools Hub icon to open the tool.
- In the Tool Hub program, you must select “Company File Issues” and then “Run QuickBooks File Doctor.
- This process may take him a minute or more to open the Doctor file.
- Once File Doctor opens, you must select your company’s file from the drop-down menu.
- Next, select Browse & Search to locate the corrupted company file.
- Now select the Check Files option and click Next.
- Wait a few minutes for the file to be scanned.
- Finally, you must enter your QuickBooks administrator password and select the Next tab.
Step 3: Reinstall the QuickBooks software
In some cases, File Doctor may not be able to resolve your issue. In this case, simply reinstall your QuickBooks software. When performing this process, you should consider the following points: Requires administrator privileges. You will also need the QuickBooks installation CD.
For Windows Vista, 7 or 8
- Press the Windows key and the R key at the same time to open the Run window.
- Open the Control Panel and press Enter.
- Under the User Accounts and Family Safety option, select Add or Remove User Accounts.
- Then click on each qbdataserveruserxx that is similar to your version:
- QuickBooks 2013: qbdataserviceuser23
- QuickBooks 2012: qbdataserviceuser22
- QuickBooks 2011: qbdataserviceuser21
- QuickBooks 2010: qbdataserviceuser20
- QuickBooks 2009: qbdataserviceuser19
- QuickBooks 2008: qbdataserviceuser18
- QuickBooks 2007: qbdataserviceuser17
- QuickBooks 2006: qbdataserviceuser16
- Click the Delete Account option.
- Finally, reinstall the QuickBooks software.
For Windows XP
- Click the Start tab and select Control Panel.
- Next, double-click the User Accounts option.
- Click on the specific qbdataserviceuserxx that is similar to your QuickBooks version:
- QuickBooks 2013: qbdataserviceuser23
- QuickBooks 2012: qbdataserviceuser22
- QuickBooks 2011: qbdataserviceuser21
- QuickBooks 2010: qbdataserviceuser20
- QuickBooks 2009: qbdataserviceuser19
- QuickBooks 2008: qbdataserviceuser18
- QuickBooks 2007: qbdataserviceuser17
- QuickBooks 2006: qbdataserviceuser16
- Select the Delete Account option.
- Reinstall the QuickBooks software.
Read Also: Ways to fix QuickBooks error code 1722
Winding Up!
We have tried to list all possible solutions that you can implement yourself to fix QuickBooks error code 6144. In some cases, you may run into a major issue or fail to integrate your solution properly, causing the same error to occur again. In this situation, you can contact our support staff through our dedicated support line at +1-844-719-2859 will be the best solution. You can discuss this issue directly with the QuickBooks premier support team and have one of our certified experts resolve the error on your behalf. We are a hub of technocrats working 24/7 to provide the best possible support services. Just give us a call and we’ll do the rest. We are available 24 hours a day to assist you.
Frequently Asked Questions
This error belongs to the 6xxx series of error codes related to company files. When you open a company file, the screen may show corruption or data corruption.
Some of the highlighted characters associated with this error are:
1. When you open a company file, your computer often immediately freezes or QuickBooks crashes.
2. I receive an error message when opening a company file.
3. Processing all input to the system takes time.
Both error codes indicate a problem with the company file and appear when the user attempts to open or modify the company file.
Users can try to fix QuickBooks error code 6144 using the following methods.
1. Use QuickBooks File Doctor to fix business and network problems.
2. Restore a backup or portable copy of your company files.
3. Use automatic data recovery.