Seeking for the process to import or export MS excel files in QuickBooks successfully? Well, if that is the case, then reading this article ahead can be of great assistance. The user can import and export various list and transaction types to and from QuickBooks desktop using different file formats. Also, he/she can import customer, vendor, items, and charts of accounts from an excel spreadsheet. There are different options available for importing excel files from QuickBooks, which we will be discussing later in this article.
Thus, make sure that you read this article till the end. Or else, you can also consult our tech team using our toll-free number, and our professionals will ensure to come up with the most promising solutions for you.
You might see also: How to Edit a Payroll Item in QuickBooks Desktop?
Steps to import and export excel files to QuickBooks
As we mentioned earlier, the user can import different things from excel spreadsheet. Let us check out the below options available when importing excel files from QuickBooks.
Option 1: Standard import
QuickBooks opens a formatted excel spreadsheet where the user can enter the information. When the user saves and closes the file, and then the user can review results and view the data in QuickBooks. To import customers, vendors, and products you sell.
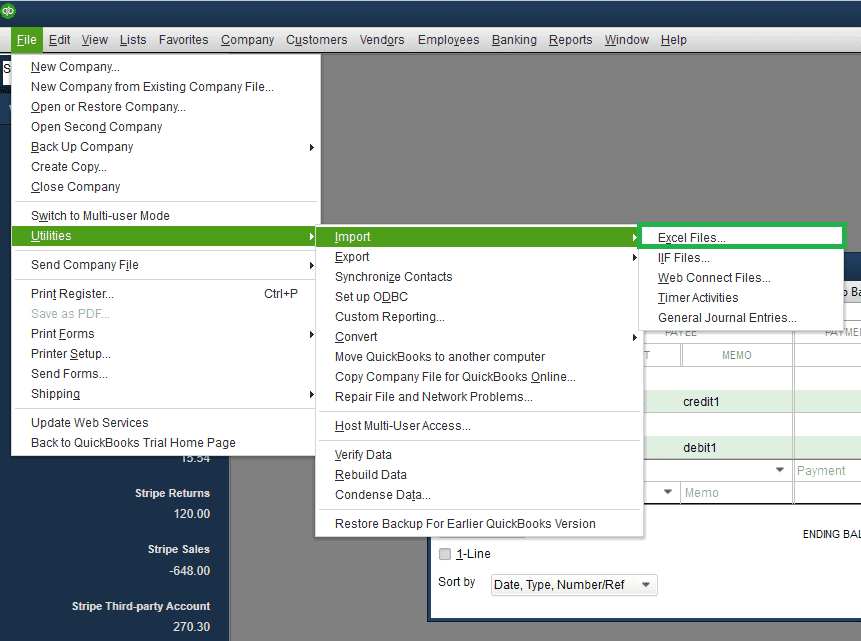
- The very first step is to move to the file menu, and select utilities then import and then excel files.

- In case the user gets the add/edit multiple list entries window and also click on no.
- The next step is to follow the wizard in importing files.
- Choose the type of data.
- And then QuickBooks opens a formatted excel spreadsheet. After the user has entered the information, saved the file and closed it, the user will get the option to add my data now.
- Also, it is suggested to review results and view data in QuickBooks.
- Last but not the least select close when done.
It should be noted that if you need to import additional customer, vendor, or item data from excel using this option, and the user can also go back to the window.
You may also like: How to Resolve the QuickBooks Error Code 15103?
Steps to import charts of accounts in QuickBooks
It should be noted that before importing, it is suggested that the user should create the backup of the company file.
- The very first step is to move to the lists menu and then choose charts of accounts.

- And also, choose the account drop down and then select import from excel.
- The next step is to choose browse to select the file you wish to import.
- And choose the file, select open.
- Now, select the excel sheet where the data you wish to import is on.
- After that, map the accounts.
This step tells QuickBooks how to import the data from the excel sheet. The column headings in QuickBooks might be different from the excel, so you would have to match them
- The user should type in a mapping name
- And also, choose account as import type.
- Match the information under QuickBooks with the column headings in the excel sheet.
- Now, select save.
- And also select import. In case it is the first time you are importing, then choose yes tab to confirm the process.
Read Also: How to Get Instant Deposits in QuickBooks Desktop?
Option 2: Add and edit multiple lists
This option will allow the user to add and edit multiple customers, vendors, and items. This is for list information and cannot be used to import transactions.
- The very first step is to select Add/edit multiple list entries from lists menu.
- And then, choose the list dropdown and select the list you wish to work with.
- After that filter the list to see a particular record.
- The next step is to select the customize columns tab to select which columns you wish to see in the add/edit multiple list entries window. This way, the user can easily work on the column they need to. And can also select the default tab to return to the present columns for the list.
- In order to add from the left pane, choose a column and select add.
- For removing, the user needs to select a column and then select remove tab.
- For rearranging, the user should select column and go for move up or move down.
- The next step is to select OK tab.
- And also, add or edit the entries by clicking on the appropriate fields. Also note that the user can copy data from excel and paste it into the window. And can also copy down and duplicate rows.
- The next step is to select save changes.
After you are done with the saving of changes, you might get a warning that might tell you the number of records saved. QuickBooks will also tell you if there are issues that need to be fixed.
For fixing the issues, perform the steps below:
- At first, one needs to click or hover the mouse in any field to see what error is.
- And then, update the record to fix the issues.
- The next step is to select save changes tab and repeat the process till all issues are fixed. Also, note that in case you don’t wish to fix any issue, then save the changes you have made and also select close without making further changes. QuickBooks will not save the changes that have issues.
Exporting the excel files
The user can export the customer, vendor, payroll lists and transactions, as well as items list into an excel spreadsheet. In case the user needs to change a report’s appearance or contents in ways that are not available in QuickBooks, then the user can also export reports and customize it in excel without affecting the QuickBooks data.
- Customer/vendor/payroll list and transactions
- Items
- Reports
Also See: How to Create a Budget or Forecast in QuickBooks Desktop?
Winding up!
Towards the end of this particular article, we expect that the user might be able to perfectly import or export excel files in QuickBooks, using the steps discussed in above. However, if for some reason, the user isn’t able to, then contacting our QuickBooks desktop support professionals using our number is suggested. Give us a call at +1-844-719-2859, and leave the rest on our team of professionals.